We’ve all been there – craving a decadent slice of chocolate cake but needing a vegan option that doesn’t compromise on taste. This vegan chocolate cake proves that plant-based desserts can be just as rich and satisfying as their traditional counterparts.
What makes this cake truly special isn’t just its incredibly moist texture or deep chocolate flavor – it’s how simple the ingredients are. We’re talking pantry staples like flour, cocoa powder, and plant milk that transform into pure magic. No eggs or dairy needed to create that perfect crumb we all love.
Whether you’re vegan, have dietary restrictions, or simply want to try something new, this cake will surprise everyone at your table. We’ve perfected this recipe through countless tests to ensure every bite delivers that fudgy richness you expect from an exceptional chocolate cake.
Ingredients
We’ve carefully selected each ingredient to create the perfect balance of flavor and texture in our vegan chocolate cake. These pantry staples work together to deliver that rich chocolatey taste you’re craving.
Dry Ingredients
- 1¾ cups all-purpose flour
- ¾ cup unsweetened cocoa powder
- 2 cups granulated sugar
- 2 teaspoons baking soda
- 1 teaspoon baking powder
- 1 teaspoon salt
- ½ teaspoon espresso powder (optional but recommended)
Wet Ingredients
- 2 cups unsweetened plant milk (almond or oat work best)
- ⅔ cup neutral oil (vegetable or canola)
- 2 tablespoons apple cider vinegar
- 2 teaspoons vanilla extract
- 1 cup hot coffee or hot water
- 1 tablespoon ground flaxseed mixed with 3 tablespoons water (flax egg)
Chocolate Frosting Ingredients
- 1 cup vegan butter (softened at room temperature)
- 3½ cups powdered sugar
- ¾ cup unsweetened cocoa powder
- ¼ cup plant milk
- 2 teaspoons vanilla extract
- ¼ teaspoon salt
- 4 ounces dark chocolate (melted and cooled)
Equipment Needed

Creating this exceptional vegan chocolate cake requires exact tools that ensure optimal mixing and baking results. We recommend gathering all equipment before beginning the baking process to streamline your workflow.
Large mixing bowls serve as the foundation for combining both wet and dry ingredients effectively. Two separate bowls allow us to properly mix ingredients without overmixing the final batter.
Measuring cups and spoons provide the precision necessary for accurate ingredient ratios. Digital scales offer even greater accuracy for flour and cocoa powder measurements when available.
A whisk helps incorporate air into the batter while ensuring smooth consistency throughout the mixture. This tool prevents lumps from forming in the cocoa powder and flour combination.
Electric mixer remains optional but significantly reduces mixing time and effort. Hand mixers work perfectly for this recipe since the batter requires gentle incorporation rather than intensive beating.
Cake pans in 8 or 9 inch sizes accommodate this recipe perfectly. Round pans create classic presentation while square pans offer easier cutting and serving options.
Measuring equipment for liquids includes glass measuring cups with clear markings for plant milk and oil. These tools ensure accurate liquid measurements that directly impact cake texture.
Rubber spatula assists in scraping bowl sides and folding ingredients together without deflating the batter. This tool maximizes ingredient usage while maintaining proper mixing technique.
Wire cooling racks prevent soggy bottoms by allowing air circulation around the finished cake layers. Proper cooling ensures optimal texture before frosting application.
Instructions

Now that we have our ingredients and equipment ready, let’s walk through the step-by-step process to create this decadent vegan chocolate cake. We’ll guide you through each stage to ensure perfect results every time.
Prep the Oven and Pans
We start by preheating our oven to 350°F (180°C) to ensure consistent baking temperature. Next, we grease two 8 or 9-inch round cake pans thoroughly with vegan butter or cooking spray. Line each pan with parchment paper for easy cake removal after baking. This preparation step prevents sticking and guarantees clean cake layers that release effortlessly from the pans.
Mix the Dry Ingredients
We combine 1 ½ cups of all-purpose flour with ¼ cup of cocoa powder in our large mixing bowl. Add 1 teaspoon of baking soda and ¼ teaspoon of salt to the flour mixture. Whisk these dry ingredients together thoroughly to ensure even distribution and eliminate any lumps. This foundation creates the structure for our moist vegan chocolate cake.
Combine the Wet Ingredients
We prepare our plant milk mixture by combining 1 cup of unsweetened vegan milk with 1 tablespoon of vinegar or lemon juice in a separate container. Allow this mixture to sit for a few minutes until it curdles slightly, creating our vegan buttermilk substitute. We then add 1 cup of sugar, ⅓ cup of vegetable oil, 1 cup of water, and 1 teaspoon of vanilla extract to complete our wet ingredient blend.
Create the Chocolate Batter
We pour the wet ingredients into our bowl of dry ingredients and mix until just combined, being careful not to overmix. The batter will look thick at this stage. Gradually add 1 cup of boiling water while mixing continuously until the batter becomes smooth and runny. This hot water activates the cocoa and creates the signature moist texture we’re after.
Bake the Cake
We divide the batter evenly between our prepared cake pans, using a kitchen scale for accuracy if available. Place both pans in the preheated oven and bake for 30-35 minutes. Test for doneness by inserting a toothpick into the center of each cake; it should come out clean or with just a few moist crumbs. Allow the cakes to cool in their pans for 10 minutes before transferring them to wire racks to cool completely before frosting.
Making the Chocolate Frosting

With our cake layers perfectly baked and cooling, we can now create the rich chocolate frosting that will transform this dessert into a show-stopping centerpiece. This vegan frosting delivers the same creamy texture and decadent flavor as traditional buttercream without any dairy products.
Prepare the Frosting Base
We begin by ensuring our vegan butter reaches room temperature for optimal mixing. The butter should feel soft to the touch but not melted, as this creates the perfect foundation for our frosting. We measure out our remaining ingredients: 3 cups powdered sugar, ¾ cup unsweetened cocoa powder, ⅓ cup plant-based milk, 2 teaspoons vanilla extract, and a pinch of sea salt.
Sifting the cocoa powder eliminates any lumps that could create an uneven texture in our finished frosting. We combine the cocoa powder with the powdered sugar in a separate bowl, whisking them together until evenly distributed. This dry mixture ensures our frosting will have a smooth, professional appearance once complete.
Achieve the Perfect Consistency
We beat the softened vegan butter using either a hand mixer or stand mixer until it becomes light and creamy. This process typically takes 2-3 minutes and creates the airy base that gives our frosting its signature texture. The butter should appear pale and fluffy when properly beaten.
Next, we add the cocoa powder and sugar mixture gradually, starting with the mixer on low speed to prevent a powdered sugar explosion. Once incorporated, we increase the speed to medium and continue beating while slowly adding the plant-based milk and vanilla extract. The mixture transforms from a thick paste into a smooth, spreadable frosting.
We assess the consistency and make adjustments as needed. If our frosting appears too thick, we add plant-based milk one tablespoon at a time until it reaches the desired spreadability. Should the frosting seem too thin, we incorporate additional powdered sugar in ¼ cup increments. The finished frosting should hold its shape when piped but spread easily across our cake layers.
| Consistency Issue | Solution | Amount to Add |
|---|---|---|
| Too thick | Plant-based milk | 1 tablespoon at a time |
| Too thin | Powdered sugar | ¼ cup increments |
| Lacks flavor | Vanilla extract | ½ teaspoon additional |
We beat the frosting on high speed for 2-3 minutes until it becomes light and fluffy, achieving the perfect texture for both spreading and decorative piping. The completed frosting can be used immediately or stored covered in the refrigerator for up to one week.
Assembly and Decoration

With our vegan chocolate cake layers baked to perfection and our rich frosting ready, we’re now prepared to create the stunning final presentation. This assembly process requires patience and careful handling to achieve professional results.
Cool and Remove from Pans
We allow our freshly baked vegan chocolate cake layers to cool in their pans for 10–20 minutes after removing them from the oven. This cooling period ensures the cake sets properly and becomes firm enough to handle without breaking. We carefully run a knife or offset spatula around the edges of each pan to loosen the cakes from the sides.
Next, we invert each pan over a wire rack or into our palm, gently tapping the bottom to release the cake layers. We remove any parchment paper that was used during baking. The cakes must cool completely before we begin frosting to prevent the frosting from melting or sliding off the warm surface.
Frost the Cake
Once our cake layers reach room temperature, we place the first layer on our serving plate or cake board. We spread approximately one-third of our vegan chocolate buttercream evenly across the top surface using an offset spatula or butter knife. The frosting should reach nearly to the edges but not overflow.
We carefully position the second cake layer on top, ensuring it sits level and centered. Using the remaining frosting, we cover the top and sides of our assembled cake with smooth, even strokes. We work methodically around the cake, building up the frosting layer gradually for consistent coverage and an attractive finish.
Final Touches
We smooth the frosting surface with our offset spatula for a classic, elegant appearance, or we can create decorative swirls and peaks for a more rustic or artistic look. We clean any frosting from the edges of our serving plate to achieve a professional presentation.
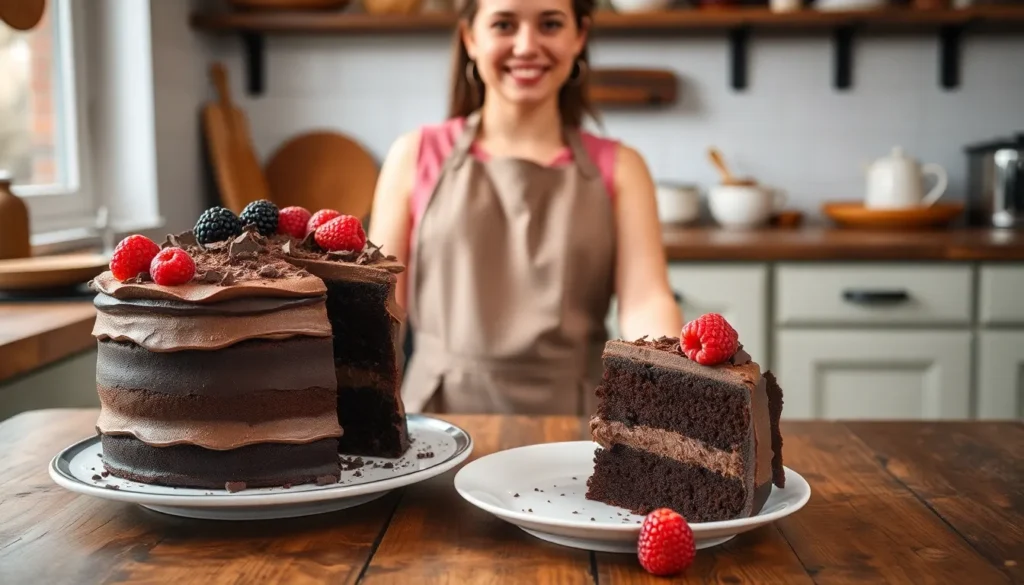
For additional decoration, we can add chocolate shavings, colorful sprinkles, or fresh fruit as desired. Our completed vegan chocolate cake should be stored in the refrigerator or a cool place, especially when using buttercream-based frosting. The cake stays fresh for 5–7 days when properly refrigerated, and we should allow it to come to room temperature before serving for optimal texture and flavor.
Storage Instructions

Once our vegan chocolate cake masterpiece is complete, we need to store it properly to maintain its moist texture and rich flavor. Proper storage techniques help preserve the cake’s quality whether we plan to enjoy it within a few days or save it for later occasions.
Room Temperature Storage
We can keep our vegan chocolate cake at room temperature for optimal texture and taste when serving within a short timeframe. The cake stays fresh in an airtight container for approximately 3 days at room temperature. A tightly sealed container prevents the cake from drying out while maintaining its signature fudgy consistency.
Refrigerator Storage
Refrigeration extends our cake’s freshness significantly when we need longer storage options. Our vegan chocolate cake remains delicious when stored in the refrigerator for up to one week in a covered container. For extended freshness, we can store it for up to two weeks when properly wrapped and refrigerated.
Freezing for Long-Term Storage
Freezing provides the best option when we want to prepare our cake well in advance. We must ensure the cake cools completely before wrapping it in freezer-safe materials. Adding a layer of aluminum foil over the initial wrapping creates an extra barrier against freezer burn.
| Storage Method | Duration | Container Type |
|---|---|---|
| Room Temperature | 3 days | Airtight container |
| Refrigerator | 1-2 weeks | Covered container |
| Freezer (whole cake) | 2 months | Freezer-safe wrap + foil |
| Freezer (any type) | 3 months | Freezer-safe wrap + foil |
Thawing Guidelines
When we’re ready to enjoy our frozen cake, we have two reliable thawing methods. Room temperature thawing works well for serving the same day, while refrigerator thawing provides more controlled results. We should add any frosting or toppings after the cake has completely thawed to ensure the best presentation and flavor distribution.
These storage methods ensure our vegan chocolate cake maintains its exceptional taste and texture regardless of when we choose to serve it.
Make-Ahead Tips

Planning ahead transforms our vegan chocolate cake baking experience into a stress-free try. We can prepare various components days or even weeks in advance without sacrificing the cake’s exceptional taste or texture.
Room Temperature Storage allows us to keep our finished cake fresh for extended periods. Our completed vegan chocolate cake maintains its moist texture and rich flavor when stored at room temperature for up to two days. We recommend covering the cake tightly with plastic wrap or storing it in an airtight container to prevent moisture loss and protect against environmental factors.
Freezing Options provide the ultimate flexibility for our baking schedule. We can freeze our unfrosted cake layers for up to two months by wrapping each layer individually in plastic wrap and placing them in freezer-safe bags. The complete frosted cake also freezes beautifully for the same duration when properly wrapped. We simply thaw frozen cakes at room temperature for several hours or overnight in the refrigerator before serving.
Frosting Preparation streamlines our assembly process significantly. We can make our chocolate frosting up to one week ahead and store it in the refrigerator until needed. The frosting maintains its smooth consistency and rich chocolate flavor throughout this storage period. We bring refrigerated frosting to room temperature and give it a quick whisk before spreading to restore its perfect texture.
Component Timeline maximizes our efficiency in the kitchen. Baking our cake layers one to two days before assembly allows the flavors to develop while giving us ample time for decorating. We store unfrosted layers wrapped tightly at room temperature or in the refrigerator depending on our timeline. This approach ensures we have fresh components ready when we need them most.
| Storage Method | Duration | Temperature | Best For |
|---|---|---|---|
| Room Temperature | Up to 2 days | Covered tightly | Short-term storage |
| Refrigerator | Up to 3-4 days | Covered container | Extended freshness |
| Freezer | Up to 2 months | Properly wrapped | Long-term planning |
Serving Suggestions

We recommend serving our vegan chocolate cake at room temperature to fully appreciate its rich flavors and moist texture. Allow the frosted cake to sit outside the refrigerator for 30-45 minutes before slicing to achieve the perfect consistency.
Temperature and Timing
Room temperature serving delivers the best flavor profile for this decadent dessert. The cake’s tender crumb and chocolate frosting reach optimal texture when neither too cold nor warm. We suggest removing individual slices from refrigerated storage about 15-20 minutes before serving to guests.
Beverage Pairings
Coffee and tea create exceptional companions for our vegan chocolate cake. Hot beverages enhance the cocoa flavors while providing a delightful contrast to the cake’s sweetness. Iced coffee or cold brew work equally well for warmer weather occasions. Plant-based milk alternatives like oat or almond milk complement the cake’s vegan profile when served alongside.
Garnish and Presentation Ideas
Fresh berries add vibrant color and natural sweetness that balances the rich chocolate flavors. Strawberries, raspberries, and blackberries provide acidic notes that cut through the cake’s decadent frosting. Chopped nuts such as toasted almonds, pecans, or hazelnuts contribute textural contrast and enhance the overall eating experience.
Shaved dark chocolate creates an elegant finishing touch that intensifies the chocolate experience. We recommend using a vegetable peeler or fine grater to create delicate chocolate curls. Dusting with powdered sugar adds visual appeal while maintaining the cake’s vegan integrity.
Portion Considerations
| Serving Size | Recommended Portions | Occasion Type |
|---|---|---|
| Small slice (2 inches) | 12-16 servings | Large gatherings |
| Medium slice (3 inches) | 8-12 servings | Dinner parties |
| Large slice (4 inches) | 6-8 servings | Family dessert |
Generous portions work well for special celebrations while smaller slices suit casual gatherings or after heavy meals. The cake’s rich density means smaller servings often satisfy guests completely.
Special Occasion Adaptations
Birthday celebrations benefit from adding fresh fruit arrangements or edible flowers around the cake base. Anniversary dinners call for elegant plating with individual portions garnished with mint leaves or chocolate sauce drizzles. Holiday gatherings welcome seasonal additions like candied orange peels or crushed peppermint during winter months.
Conclusion
We’ve shown you that creating an exceptional vegan chocolate cake doesn’t require complicated techniques or hard-to-find ingredients. This recipe delivers the rich decadent flavor and moist texture that every chocolate lover craves while staying completely plant-based.
The beauty of this cake lies in its versatility and reliability. Whether you’re serving guests with dietary restrictions or simply exploring delicious alternatives this recipe consistently produces bakery-quality results that’ll impress everyone at your table.
With proper storage techniques and make-ahead options you can enjoy this indulgent treat whenever the craving strikes. We’re confident this vegan chocolate cake will become your go-to dessert recipe for celebrations everyday moments and everything in between.
Frequently Asked Questions
What makes this vegan chocolate cake different from regular chocolate cake?
This vegan chocolate cake uses plant-based ingredients like plant milk, neutral oil, and flax eggs instead of dairy and regular eggs. Despite these substitutions, it maintains the same rich, moist texture and fudgy flavor as traditional chocolate cake through carefully balanced ingredients and tested ratios.
What ingredients do I need for the vegan chocolate cake?
The dry ingredients include all-purpose flour, cocoa powder, sugar, baking soda, baking powder, salt, and optional espresso powder. Wet ingredients consist of plant milk, neutral oil, apple cider vinegar, vanilla extract, hot coffee or water, and a flax egg. Simple pantry staples create this delicious dessert.
How long does it take to bake this vegan chocolate cake?
The cake bakes at 350°F (180°C) for 30-35 minutes. Total preparation time includes mixing ingredients, baking, and cooling before frosting. Use a toothpick test to check for doneness – it should come out with just a few moist crumbs attached.
Can I make the frosting ahead of time?
Yes, the chocolate frosting can be made up to one week ahead and stored in the refrigerator. Use room temperature vegan butter for best results and beat until light and creamy. The frosting maintains its rich flavor when properly stored in a covered container.
How should I store the finished vegan chocolate cake?
Store at room temperature for up to 3 days in an airtight container, or refrigerate for 1-2 weeks in a covered container. For longer storage, wrap properly and freeze for up to 2 months. Thaw at room temperature or in the refrigerator before serving.
What equipment do I need to make this cake?
Essential equipment includes large mixing bowls, measuring cups and spoons, a whisk, 8 or 9-inch cake pans, rubber spatula, and wire cooling racks. An electric mixer is optional but helpful. Glass measuring cups work best for liquid ingredients to ensure accurate measurements.
How do I know when the cake is properly baked?
Insert a toothpick into the center of the cake after 30-35 minutes of baking. It should come out with just a few moist crumbs – not wet batter. The cake should also spring back lightly when touched and start pulling away from the pan edges.
What’s the best way to serve this vegan chocolate cake?
Serve at room temperature for optimal flavor and texture. Allow refrigerated cake to sit for 30-45 minutes before slicing. Pair with coffee or tea to enhance cocoa flavors, and consider garnishing with fresh berries or chopped nuts for added color and texture.


