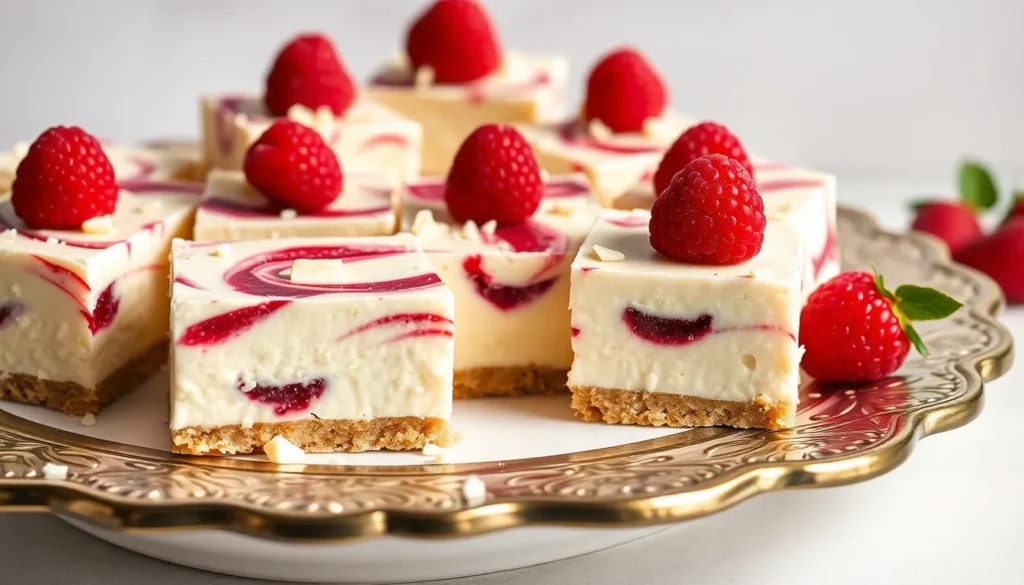
We’ve discovered the perfect dessert that combines three irresistible flavors in one show-stopping treat. These white chocolate raspberry cheesecake bars deliver the creamy richness of classic cheesecake with the elegant sweetness of white chocolate and the bright tartness of fresh raspberries.
What makes these bars absolutely magical is how the flavors complement each other perfectly. The buttery graham cracker crust provides the ideal foundation while the silky white chocolate cheesecake filling melts in your mouth. Those gorgeous raspberry swirls don’t just add stunning visual appeal – they create delightful pockets of fruity flavor that balance the richness beautifully.
We love making these bars because they’re surprisingly simple to prepare yet look incredibly sophisticated. They’re perfect for dinner parties special occasions or when you want to treat yourself to something extraordinary. Trust us – once you try these decadent bars you’ll understand why they’ve become our go-to dessert for impressing guests.
Ingredients
We’ve organized our ingredients by component to help you prepare each layer systematically. Quality ingredients make all the difference in achieving that perfect balance of flavors and textures.
For the Crust
- 1½ cups graham cracker crumbs
- ⅓ cup granulated sugar
- 6 tablespoons unsalted butter, melted
- ¼ teaspoon salt
For the Cheesecake Filling
- 24 oz cream cheese, softened to room temperature
- ¾ cup granulated sugar
- 3 large eggs, room temperature
- 1 teaspoon vanilla extract
- ½ cup sour cream
- 6 oz white chocolate, melted and cooled slightly
- 2 tablespoons all-purpose flour
For the Raspberry Swirl
- 1 cup fresh raspberries
- 3 tablespoons granulated sugar
- 1 tablespoon cornstarch
- 1 tablespoon fresh lemon juice
For the White Chocolate Topping
- 4 oz white chocolate, chopped
- ¼ cup heavy cream
- Fresh raspberries for garnish
- White chocolate shavings for decoration
Equipment Needed
 1")
Creating these delectable white chocolate raspberry cheesecake bars requires the right kitchen tools to ensure perfect results. We recommend gathering all equipment before starting to streamline your baking process.
Stand Mixer serves as our most essential tool for achieving the silky smooth cheesecake filling. This powerful appliance effortlessly combines cream cheese with other ingredients while eliminating lumps that could compromise texture.
9×13-inch Baking Pan provides the ideal dimensions for our bars, allowing proper thickness and even baking. We suggest using a metal pan for optimal heat distribution throughout the cheesecake layer.
Microwave-Safe Bowl becomes crucial for melting white chocolate chips without burning. Glass or ceramic bowls work best as they heat evenly and won’t retain odors from previous uses.
Food Processor makes quick work of creating fine graham cracker crumbs for our crust. You can also use a rolling pin and sealed plastic bag as an alternative method.
Medium Saucepan helps us prepare the raspberry swirl by cooking berries with sugar and cornstarch. Choose a heavy-bottomed pan to prevent scorching during the cooking process.
Rubber Spatula ensures we scrape every bit of filling from mixing bowls while also creating beautiful swirl patterns in our cheesecake layer.
Aluminum Foil protects our oven from potential spills and helps create even baking conditions. We recommend lining the pan with foil for easy removal after chilling.
Wire Cooling Rack allows proper air circulation around our finished bars during the cooling phase. This prevents condensation from forming on the bottom of the pan.
Instructions
 2")
Now that we have our ingredients measured and equipment ready let’s walk through each step to create these stunning white chocolate raspberry cheesecake bars.
Prep the Pan and Oven
We start by preheating our oven to 325°F for optimal baking temperature. Line your 9×13-inch baking pan with aluminum foil leaving some overhang for easy removal later. This preparation step ensures our bars won’t stick and makes cleanup effortless.
Make the Crust
In a medium bowl we combine the graham cracker crumbs granulated sugar and salt. Pour the melted butter over the dry ingredients and mix until the mixture resembles wet sand. Press this mixture firmly and evenly into the bottom of our prepared pan using the bottom of a measuring cup or your fingers. Bake the crust for 10 minutes until it’s lightly golden and set then remove from oven and let it cool while we prepare the filling.
Prepare the Cheesecake Filling
Beat the softened cream cheese in your stand mixer on medium speed until completely smooth and creamy with no lumps remaining. Gradually add the granulated sugar and continue beating until well combined. Add eggs one at a time mixing just until incorporated after each addition. Pour in the vanilla extract and sour cream then mix gently. In a microwave-safe bowl melt the white chocolate in 30-second intervals stirring between each until smooth then let it cool slightly. Slowly add the cooled melted white chocolate to our cream cheese mixture along with the flour and mix just until combined being careful not to overmix.
Create the Raspberry Swirl
Place fresh raspberries sugar cornstarch and lemon juice in a medium saucepan over medium heat. Cook the mixture for 5-7 minutes stirring frequently until the raspberries break down and the sauce thickens. The cornstarch helps create the perfect consistency for swirling. Remove from heat and let the raspberry sauce cool to room temperature.
Assemble the Bars
Pour half of our cheesecake filling over the baked crust and spread it evenly. Drizzle half of the cooled raspberry sauce in lines across the surface. Add the remaining cheesecake filling and spread gently to cover. Top with the remaining raspberry sauce in parallel lines. Using a toothpick or knife tip create swirl patterns by drawing perpendicular lines through the raspberry sauce creating a beautiful marbled effect.
Bake the Cheesecake Bars
Bake our assembled bars for 35-40 minutes until the edges are set and the center has just a slight jiggle when gently shaken. The surface should look mostly set but not completely firm. Avoid overbaking as this can cause cracks and a dry texture.
Add the White Chocolate Topping
While the bars are still warm we prepare our white chocolate topping. Heat the heavy cream in a small saucepan until it just begins to simmer then pour it over the chopped white chocolate in a bowl. Let it sit for 2 minutes then stir until smooth and glossy. Drizzle this white chocolate ganache over the warm bars for an elegant finishing touch.
Cool and Chill
Allow the bars to cool at room temperature for 45 minutes before transferring to the refrigerator. Chill for at least 3 hours or up to 24 hours before slicing. This chilling time is crucial as it allows the bars to firm up properly and makes clean slicing possible. Use the foil overhang to lift the bars from the pan before cutting into squares and garnish with fresh raspberries and white chocolate shavings if desired.
Make-Ahead Instructions
 3")
These white chocolate raspberry cheesecake bars are perfect for advance preparation and make entertaining stress-free. Planning ahead allows the flavors to meld beautifully and ensures the bars set to the perfect creamy texture.
Proper Cooling and Chilling Timeline
After baking, we must allow the bars to cool completely to room temperature before refrigerating. This cooling process takes approximately 45 minutes to 1 hour and prevents condensation from forming inside the storage container. Once cooled, refrigerate the bars for at least 3 hours to achieve proper setting.
For optimal texture and flavor development, we recommend chilling the bars for up to 1 day before serving. This extended chilling time allows the white chocolate and raspberry flavors to integrate fully throughout the cheesecake layer.
Storage Before Serving
| Storage Method | Duration | Instructions |
|---|---|---|
| Short-term refrigeration | Up to 1 week | Cover with aluminum foil or plastic wrap after initial 3-hour chill |
| Freezing | Up to 1 month | Cut into squares, wrap individually in parchment paper, store in airtight container |
For refrigerator storage lasting up to 1 week, cover the entire pan with aluminum foil or plastic wrap after the initial 3-hour chilling period. This prevents the bars from absorbing other flavors and maintains their creamy texture.
Freezing Instructions for Long-Term Storage
We can freeze these cheesecake bars for up to 1 month with proper preparation. Cut the cooled and chilled bars into individual squares using a sharp knife, wiping the blade clean between cuts for neat edges. Wrap each square individually in parchment paper to prevent freezer burn and maintain freshness.
Place the wrapped bars in an airtight container or freezer bag, removing as much air as possible. Label the container with the date and contents for easy identification.
Thawing and Serving
Thaw frozen bars in the refrigerator rather than at room temperature to maintain their structure and prevent condensation. Allow 2 to 3 hours for complete thawing before serving. The bars will taste just as fresh as when first made, with the raspberry and white chocolate flavors remaining vibrant and well-balanced.
Storage Tips
 4")
We recommend storing your white chocolate raspberry cheesecake bars properly to maintain their creamy texture and vibrant flavors. These delicate desserts require exact storage methods to preserve their quality and extend their shelf life.
Refrigerator Storage
Store leftover cheesecake bars in an airtight container in the refrigerator for optimal freshness. We find that properly stored bars maintain their quality for up to 1 week when sealed correctly. The container must be tightly covered to prevent the bars from absorbing other flavors and to maintain their creamy consistency.
Freezer Storage
For longer storage we suggest freezing the bars using this simple method. Allow the bars to cool completely after baking before beginning the freezing process. Place the cooled bars in the freezer for approximately 1 hour to firm up their structure.
| Storage Method | Duration | Container Type |
|---|---|---|
| Refrigerator | 3-4 days to 1 week | Airtight container |
| Freezer | 1-6 months | Wrapped + freezer bag |
| Make-ahead prep | Up to 2 days | Refrigerator storage |
Wrap each bar tightly in plastic wrap or aluminum foil after the initial firming period. Place the wrapped bars in a sealed freezer bag for maximum protection against freezer burn. Frozen bars maintain their quality for up to 6 months when stored properly.
When you’re ready to serve frozen bars thaw them overnight in the refrigerator. This gradual thawing process preserves the bars’ texture and prevents condensation from forming on the surface.
Make-Ahead Storage
We recommend preparing components in advance for easier entertaining. The raspberry sauce can be made up to 1 week ahead and stored in a sealed glass container in the refrigerator. This advance preparation allows the flavors to develop and saves time on the day of serving.
Prepare the complete cheesecake bars up to 2 days in advance through the baking step. Store them covered in the refrigerator until ready to add the final white chocolate topping and serve. For special occasions chill the finished bars in the refrigerator overnight and add fresh raspberry garnishes just before serving to maintain their vibrant appearance.
Serving Suggestions
 5")
Perfect presentation transforms our white chocolate raspberry cheesecake bars from delicious dessert to stunning centerpiece. We recommend using a sharp knife wiped clean between each cut to achieve those professional-looking clean edges that showcase the beautiful layers.
Plating and Presentation
Remove the bars from the refrigerator about 10 minutes before serving to allow them to soften slightly for easier cutting. Place each square on individual dessert plates and garnish with fresh raspberries arranged around the base. A light dusting of powdered sugar adds an elegant finishing touch that contrasts beautifully with the rich white chocolate topping.
Complementary Accompaniments
These bars pair wonderfully with several accompaniments that enhance their flavors. Serve alongside a dollop of freshly whipped cream to add lightness that balances the rich cheesecake. Vanilla ice cream creates a delightful temperature contrast when served beside the chilled bars. Fresh mint sprigs provide a pop of color and a subtle aromatic element that complements the raspberry flavors.
Storage and Serving Timeline
| Storage Method | Duration | Temperature | Notes |
|---|---|---|---|
| Refrigerated | Up to 1 week | 35-40°F | Cover with foil after initial chilling |
| Room Temperature | 2-3 hours | 65-70°F | Perfect for serving at parties |
| Frozen (thawed) | Same day | 35-40°F | Thaw completely in refrigerator |
Special Occasion Presentations
For dinner parties or special events, arrange the bars on a decorative serving platter with additional raspberry sauce drizzled artistically around the edges. White chocolate shavings scattered over the platter create visual interest and hint at the flavors within. Consider serving with small dessert forks for an upscale presentation that allows guests to savor each bite slowly.
The bars maintain their structure beautifully when served at room temperature, making them ideal for buffet-style serving where they may sit out for several hours. This flexibility allows hosts to prepare and plate the dessert ahead of time without worrying about last-minute preparation.
Troubleshooting Tips
 6")
Even experienced bakers encounter challenges when making white chocolate raspberry cheesecake bars. We’ve compiled our top answers to help you navigate common issues and achieve perfect results every time.
Preventing Cracks
Temperature control plays a crucial role in preventing unsightly cracks in your cheesecake bars. We always ensure all ingredients reach room temperature before mixing to create a smooth and even batter. Overmixing introduces air bubbles that expand during baking and cause surface cracks to form.
Gentle mixing techniques preserve the delicate texture of your cheesecake filling while preventing structural issues. We recommend beating the cream cheese mixture just until smooth and stopping immediately once ingredients combine. Watch for visual cues during baking as the edges turn lightly golden and the center appears just set rather than fully firm.
Achieving Clean Cuts
Sharp knife technique transforms messy slices into professional-looking portions. We run our knife under hot water before each cut to melt through the creamy filling without dragging or tearing. Wiping the blade clean between cuts prevents white chocolate and raspberry residue from creating uneven edges.
Freezing your cheesecake bars for approximately 30 minutes before slicing provides extra stability for cleaner cuts. This brief chilling period firms the texture without compromising the creamy consistency that makes these bars so appealing. Room temperature cutting becomes much easier when you prepare the bars with this simple technique.
Fixing Overcooked Bars
Recognizing proper doneness prevents the dry texture that comes from overbaking cheesecake bars. We look for lightly browned edges while the center remains just set but still slightly jiggly when gently shaken. Extended baking time creates a tough and crumbly texture that detracts from the luxurious mouthfeel.
Moisture restoration becomes possible when bars accidentally overbake even though careful monitoring. Extended refrigeration helps redistribute remaining moisture throughout the bars while improving their texture. We often drizzle additional raspberry sauce over slightly overcooked bars to add moisture and enhance the fruity flavor profile that makes this dessert so memorable.
Conclusion
These white chocolate raspberry cheesecake bars deliver everything we want in a show-stopping dessert – incredible flavor balance rich texture and stunning visual appeal. We’ve shared all the essential tips and techniques you’ll need to create bakery-quality results right in your own kitchen.
The beauty of this recipe lies in its flexibility. Whether you’re planning ahead for a special celebration or looking for a weekend baking project these bars accommodate your schedule perfectly. The make-ahead options and storage tips we’ve outlined ensure you can enjoy these treats whenever the craving strikes.
We’re confident that once you try these cheesecake bars they’ll become a staple in your dessert repertoire. The combination of creamy white chocolate tangy raspberries and buttery crust creates an unforgettable experience that’ll have everyone asking for the recipe.
Frequently Asked Questions
What ingredients do I need for white chocolate raspberry cheesecake bars?
You’ll need graham cracker crumbs, sugar, butter, and salt for the crust. The filling requires cream cheese, sugar, eggs, vanilla extract, sour cream, melted white chocolate, and flour. For the raspberry swirl, gather fresh raspberries, sugar, cornstarch, and lemon juice. The topping uses white chocolate, heavy cream, plus fresh raspberries and white chocolate shavings for garnish.
How long do these cheesecake bars need to chill?
The bars should cool completely at room temperature for 45 minutes to 1 hour, then refrigerate for at least 3 hours before serving. For optimal flavor development, chill them overnight or up to 1 day. This chilling time allows the flavors to meld beautifully and makes cutting much easier.
Can I make white chocolate raspberry cheesecake bars ahead of time?
Yes, these bars are perfect for make-ahead preparation. You can make the complete bars up to 2 days in advance before adding the final topping. The raspberry sauce can be prepared up to 1 week ahead and stored in the refrigerator. This makes them ideal for entertaining and special occasions.
How should I store leftover cheesecake bars?
Store leftover bars in the refrigerator for up to 1 week, covered with aluminum foil or plastic wrap. For longer storage, freeze individual squares wrapped in parchment paper in an airtight container for up to 6 months. Thaw frozen bars in the refrigerator to preserve their texture and flavor.
What’s the best way to cut clean slices?
Use a sharp knife and chill the bars completely before cutting. Remove them from the refrigerator about 10 minutes before slicing for easier cutting. Clean the knife between cuts with a damp cloth to maintain neat edges. A thin, sharp blade works best for achieving professional-looking squares.
How do I prevent cracks in my cheesecake bars?
Ensure all ingredients are at room temperature before mixing to prevent cracking. Avoid overmixing the batter, which can incorporate too much air. Bake until edges are lightly browned and the center is slightly jiggly. Proper temperature control and gentle mixing are key to achieving smooth, crack-free bars.
What equipment do I need to make these bars?
Essential equipment includes a stand mixer for smooth filling, a 9×13-inch baking pan, and a microwave-safe bowl for melting chocolate. You’ll also need a food processor for graham cracker crumbs, a medium saucepan for raspberry swirl, rubber spatula, aluminum foil for pan lining, and a wire cooling rack.


