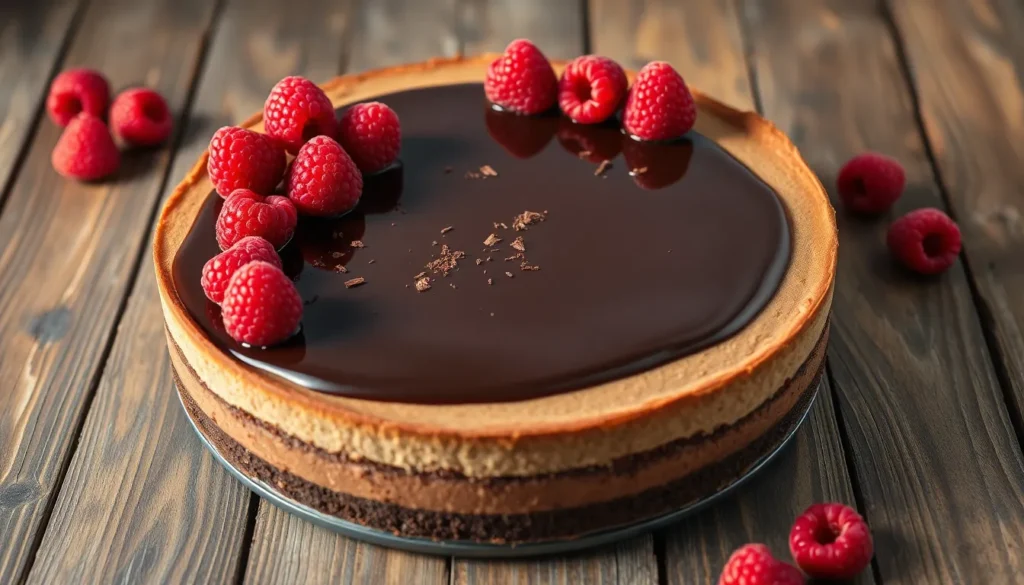
Baked chocolate cheesecake combines two of our favorite desserts into one show-stopping treat that’s guaranteed to impress. This rich and velvety dessert features a smooth chocolate-infused filling nestled on a buttery graham cracker crust – it’s pure indulgence in every bite.
We’ve perfected this recipe to deliver the ultimate chocolate cheesecake experience without the fuss. Unlike traditional New York-style cheesecakes that can crack or sink, our foolproof method ensures a perfectly smooth top and creamy texture every time. The deep chocolate flavor balances beautifully with the tangy cream cheese, creating a dessert that’s neither too sweet nor too heavy.
Whether you’re celebrating a special occasion or simply treating yourself to something extraordinary, this baked chocolate cheesecake delivers restaurant-quality results right from your own kitchen. With simple ingredients and our step-by-step guidance, you’ll create a dessert that looks as stunning as it tastes.
Equipment Needed
Creating our baked chocolate cheesecake requires exact tools to achieve that perfect texture and presentation we’re aiming for. Having the right equipment makes the difference between a good cheesecake and an exceptional one.
Essential Baking Equipment:
- 9-inch springform pan
- Electric mixer (stand or hand mixer)
- Large mixing bowls (at least 2)
- Measuring cups and spoons
- Rubber spatula
- Wire cooling rack
- Aluminum foil
- Roasting pan (for water bath)
Food Processor and Preparation Tools:
- Food processor (for crushing graham crackers)
- Fine-mesh sieve
- Offset spatula
- Kitchen scale (optional but recommended)
The springform pan is absolutely crucial for our chocolate cheesecake success. This removable-bottom pan allows us to release the finished cheesecake without damaging its delicate structure. We recommend investing in a quality springform pan that seals tightly to prevent water from seeping in during the water bath process.
Our electric mixer eliminates the lumps that can plague cream cheese mixtures. Whether you choose a stand mixer or hand mixer, ensure it has enough power to thoroughly blend the cream cheese to silky smoothness. The paddle attachment works best for stand mixers as it incorporates ingredients without overbeating.
Water Bath Setup:
The roasting pan serves as our water bath vessel, creating gentle steam that prevents cracking. Choose a pan large enough to accommodate your springform pan with room to spare. Heavy-duty aluminum foil wraps around the springform pan bottom, creating a watertight seal that protects our crust from moisture.
Sharp knives and clean towels round out our equipment list for final presentation and cleanup. Having everything prepared before we start mixing ensures smooth execution from start to finish.


Ingredients

We’ve organized our ingredient list into three distinct components to make your shopping and preparation effortless. Each section corresponds to a exact layer of our decadent baked chocolate cheesecake.
For the Chocolate Crust
- 1.5 cups Oreo crumbs (180g)
- ¼ cup unsalted butter (57g), melted
For the Chocolate Cheesecake Filling
- 16 oz cream cheese (455g), room temperature
- ¾ cup granulated sugar (150g)
- ¼ cup light brown sugar (50g)
- 3 large eggs, room temperature
- 2 large egg yolks, room temperature
- 1 tablespoon vanilla extract
- 3 tablespoons cocoa powder
- ½ cup whipping cream (120g)
- 9 oz dark chocolate (255g), melted and cooled
For the Chocolate Ganache Topping
- 6 oz semi-sweet chocolate (175g), finely chopped
- ½ cup whipping cream (120g), for ganache preparation


Instructions

Follow these step-by-step instructions to create the perfect baked chocolate cheesecake with rich layers of flavor and silky smooth texture. Our detailed process ensures professional results every time.
Prep the Pan and Oven
Preheat your oven to 325°F (160°C) for consistent baking temperature. Lightly grease the bottom and sides of your 9-inch springform pan with butter or cooking spray. Wrap the exterior of the pan with multiple layers of heavy-duty aluminum foil extending up the sides to create a watertight seal. This prevents water from seeping into the pan during the water bath process. Position your oven rack in the lower third for even heat distribution.
Make the Chocolate Crust
Combine 1.5 cups of Oreo cookie crumbs with ¼ cup of melted unsalted butter in a medium bowl. Mix thoroughly until the crumbs are evenly moistened and hold together when pressed. Press the mixture firmly into the bottom of your prepared springform pan using the bottom of a measuring cup or your fingers. Create an even layer that extends slightly up the sides by about ½ inch. Bake the crust for 8-10 minutes until set and fragrant. Remove from oven and let cool while preparing the filling.
Prepare the Chocolate Cheesecake Filling
Melt 6 oz of dark chocolate using a double boiler or microwave in 30-second intervals until smooth. Set aside to cool slightly. Beat 16 oz of room temperature cream cheese in your stand mixer fitted with the paddle attachment on medium speed for 2-3 minutes until completely smooth and no lumps remain. Gradually add ½ cup granulated sugar and ¼ cup light brown sugar while mixing on low speed. Add eggs one at a time beating well after each addition until fully incorporated. Mix in 1 teaspoon vanilla extract and ¼ cup cocoa powder until evenly distributed. Slowly pour in the cooled melted chocolate while mixing on low speed. Add ¼ cup whipping cream and beat until the mixture is smooth and well combined.
Assemble and Bake
Pour the chocolate cheesecake filling over the prepared crust spreading it evenly with a rubber spatula. Gently tap the pan on the counter to release any air bubbles. Place the foil-wrapped springform pan inside a large roasting pan. Carefully pour boiling water into the roasting pan until it reaches halfway up the sides of the springform pan. Bake for 50-75 minutes until the center is set but still slightly jiggly when gently shaken. The edges should appear firm while the center maintains a subtle wobble.
Cool and Chill
Turn off the oven and crack the door open about 1 inch. Allow the cheesecake to cool inside the oven for 1 hour to prevent sudden temperature changes that cause cracking. Remove from the water bath and transfer to a wire cooling rack. Cool completely at room temperature for 2 hours. Cover with plastic wrap and refrigerate for at least 4-6 hours or overnight until completely chilled and firm.
Make the Chocolate Ganache Topping
Place 6 oz of finely chopped semi-sweet chocolate in a heatproof bowl. Heat ½ cup of whipping cream in a small saucepan until it just begins to simmer. Pour the hot cream over the chopped chocolate and let sit undisturbed for 2-3 minutes. Stir gently from the center outward until the mixture becomes smooth and glossy. Let the ganache cool for 10-15 minutes until it reaches a pourable consistency. Remove the cheesecake from the refrigerator and pour the ganache over the top spreading it evenly to the edges with an offset spatula.


Storage Instructions

After putting all that effort into creating our perfect baked chocolate cheesecake we want to ensure it stays fresh and delicious for as long as possible. Proper storage techniques will maintain the creamy texture and rich chocolate flavor we worked so hard to achieve.
Refrigerator Storage
We recommend storing our finished chocolate cheesecake in the refrigerator where it will maintain peak quality for up to 10 days. Before placing it in storage we need to ensure the cheesecake has cooled completely to prevent moisture buildup that could affect the texture.
Once cooled we should wrap the entire cheesecake tightly in plastic wrap to create a protective barrier. An airtight container provides the best protection against moisture and prevents other refrigerator flavors from affecting our chocolate masterpiece. The ganache topping will firm up beautifully during refrigeration creating an elegant finish.
Freezer Storage
For longer term storage we can freeze our chocolate cheesecake for up to 3 months without important quality loss. The freezing process requires complete cooling first followed by tight wrapping to prevent freezer burn.
| Storage Method | Duration | Temperature | Container Requirements |
|---|---|---|---|
| Refrigerator | Up to 10 days | 35-40°F | Airtight container or plastic wrap |
| Freezer | Up to 3 months | 0°F or below | Tight wrapping plus freezer-safe container |
We should note that freezing may slightly alter the texture making it a bit denser than fresh cheesecake. But this method works exceptionally well when we need to prepare our dessert well in advance for special occasions.
Handling and Serving Tips
Gentle handling prevents cracks or damage to our beautifully smooth surface. We recommend removing the cheesecake from refrigerated storage about 30 minutes before serving to allow it to reach the ideal serving temperature. This brief warming period enhances the creamy texture and allows the chocolate flavors to fully develop on the palate.


Serving Suggestions

Our baked chocolate cheesecake transforms into an elegant dessert with the right serving touches. We recommend removing the cheesecake from the refrigerator 30 minutes before serving to achieve the perfect creamy texture and enhanced flavor profile.
Ganache Topping Excellence
Creating a silky chocolate ganache elevates our cheesecake to restaurant quality. We pour hot cream over finely chopped chocolate and let it create a glossy, decadent finish. The ganache can dramatically drip down the sides for an impressive visual presentation that guests will remember.
Whipped Cream Enhancements
Piping chilled chocolate whipped cream around the edges adds both flavor depth and visual appeal. We suggest using a star tip to create elegant rosettes that complement the rich chocolate base. Regular whipped cream also works beautifully when piped over the ganache layer.
Fresh Fruit Pairings
Fresh berries provide the perfect tart contrast to our rich chocolate cheesecake. We particularly love raspberries and strawberries for their vibrant colors and ability to cut through the dessert’s richness. The natural acidity balances the sweetness while adding nutritional value.
Chocolate Garnish Options
Sprinkling chocolate shavings or curls over the top enhances both texture and chocolate intensity. We recommend using a vegetable peeler on room temperature chocolate to create elegant curls. Chocolate chips offer a simpler alternative that still delivers visual impact.
Indulgent Toppings
For extra decadence, we top our cheesecake with whole or chopped truffles, Ferrero Rocher, or Lindt balls. Popular chocolate bars like Snickers or Heath Bars can be crumbled over individual slices for personalized presentations that cater to different preferences.
Sauce Combinations
Drizzling raspberry or chocolate sauce on each slice before serving adds moisture and complementary flavors. We suggest warming the sauce slightly for easier drizzling and better flavor integration with the cool cheesecake.
Presentation Tips
Using a flat plate with a thin spatula or pie server ensures clean slicing and professional presentation. We add finishing touches just before serving to maintain freshness and visual appeal throughout the dining experience.


Tips for the Perfect Baked Chocolate Cheesecake

Preparation Essentials
Room temperature ingredients create the foundation for our silky smooth cheesecake. We recommend removing cream cheese from the refrigerator at least 2 hours before mixing to ensure it blends effortlessly without lumps. Cold ingredients resist proper incorporation and can result in a dense texture that detracts from the luxurious mouthfeel we’re aiming for.
Our crust benefits from prebaking to maintain its structural integrity. We bake the Oreo crust for approximately 10 minutes before adding the chocolate filling. This step prevents the crust from becoming soggy and ensures it holds together beautifully when we slice the finished cheesecake.
Air bubbles can create unsightly cracks and texture issues in our final product. We gently tap the filled cheesecake pan on our work surface several times to release trapped air. This simple technique promotes a perfectly smooth top surface that showcases our chocolate creation.
Baking Techniques
Water bath baking protects our cheesecake from the harsh direct heat of the oven. We wrap our springform pan thoroughly with heavy duty aluminum foil to prevent water from seeping into the pan. The gentle steam environment prevents cracking and burning while ensuring even heat distribution throughout the baking process.
| Temperature Setting | Purpose | Results |
|---|---|---|
| 325°F (160°C) | Gentle baking | Prevents cracking and overbaking |
| 375°F | Higher heat option | Faster baking but requires careful monitoring |
Temperature control determines the success of our baked chocolate cheesecake. We preheat our oven to 325°F for the most reliable results. This moderate temperature allows the center to set gradually while the edges firm up properly.
Overbaking creates the dreaded cracks that can ruin our presentation. We watch for edges that appear set while the center maintains a slight jiggle. The residual heat continues cooking the cheesecake even after we remove it from the oven.
Cooling and Chilling Process
Gradual cooling prevents thermal shock that causes surface cracks. We turn off the oven and crack the door slightly to let our cheesecake cool slowly on a wire rack. Sudden temperature changes stress the delicate structure we’ve worked so hard to create.
Proper chilling time allows our chocolate cheesecake to develop its signature texture and flavor. We refrigerate the cooled cheesecake for at least 4 hours or overnight before serving. This extended chilling period helps the filling set completely and makes slicing much cleaner.
Additional Success Strategies
Parchment paper between the pan bottom and ring facilitates easy removal without damaging our creation. We cut a circle of parchment to fit the bottom of our springform pan before adding the crust mixture. This simple step prevents sticking and ensures our cheesecake releases cleanly.
Thorough mixing of crust ingredients creates an even foundation for our chocolate filling. We combine our Oreo crumbs and melted butter until the mixture resembles wet sand and holds together when pressed. Proper crust preparation supports the entire structure of our finished dessert.


Conclusion
We’ve provided you with everything needed to create an exceptional baked chocolate cheesecake that’ll impress any crowd. From selecting the right equipment to mastering the perfect ganache topping this comprehensive guide ensures your success in the kitchen.
The beauty of this recipe lies in its balance – combining rich chocolate flavors with creamy cheesecake texture while avoiding common pitfalls like cracking or sinking. With proper techniques and quality ingredients you’ll achieve professional-level results from your home kitchen.
Whether you’re preparing for a special celebration or simply treating yourself to something extraordinary this baked chocolate cheesecake delivers on both flavor and presentation. The detailed storage tips and serving suggestions we’ve shared will help you maximize enjoyment and maintain that perfect taste for days to come.
Your next dinner party or family gathering just got a whole lot sweeter.
Frequently Asked Questions
What makes this chocolate cheesecake different from regular cheesecake?
This baked chocolate cheesecake combines rich chocolate flavors with creamy cheesecake texture, featuring a chocolate Oreo crust, chocolate-infused filling, and glossy ganache topping. The recipe is designed to prevent common issues like cracking and sinking, ensuring a smooth, restaurant-quality result with perfect balance between sweetness and tanginess.
What equipment do I need to make this chocolate cheesecake?
Essential equipment includes a 9-inch springform pan, electric mixer, large mixing bowls, measuring cups and spoons, rubber spatula, wire cooling rack, aluminum foil, and a roasting pan for the water bath. The springform pan is crucial for easy removal, while the water bath setup prevents cracking during baking.
How long can I store the chocolate cheesecake?
The cheesecake can be refrigerated for up to 10 days when stored in an airtight container or wrapped in plastic wrap. For longer storage, it can be frozen for up to 3 months, though freezing may slightly alter the texture. Always keep it properly covered to prevent moisture buildup.
Why do I need to use a water bath when baking cheesecake?
A water bath provides gentle, even heat distribution that prevents the cheesecake from cracking or overcooking. The steam created helps maintain moisture in the oven, ensuring a smooth, creamy texture. Wrap the springform pan in heavy-duty aluminum foil to create a watertight seal.
How do I prevent my cheesecake from cracking?
Use room temperature ingredients for smooth mixing, bake in a water bath for gentle heat, avoid overmixing to prevent air bubbles, and cool gradually in the oven with the door slightly open. Proper temperature control during baking, cooling, and chilling processes is essential for crack-free results.
What are the best toppings and garnishes for chocolate cheesecake?
Popular toppings include chocolate ganache for a glossy finish, fresh berries like raspberries and strawberries, chocolate whipped cream piped around edges, chocolate shavings or truffles, and drizzled raspberry or chocolate sauce. These additions enhance both flavor and visual appeal while balancing the rich chocolate taste.
How far in advance can I make this cheesecake?
This cheesecake is perfect for advance preparation. It requires several hours of chilling after baking, so it’s ideal to make it a day ahead. The flavors actually improve after 24 hours of refrigeration. Remove from refrigerator 30 minutes before serving for optimal texture and enhanced flavor.
Can I make this cheesecake without a springform pan?
While a springform pan is highly recommended for easy removal without damaging the cheesecake, you can use a regular 9-inch round cake pan lined with parchment paper. However, removal will be more challenging and may affect the final presentation. The springform pan’s removable bottom ensures professional-looking results.