We’ve all fallen head over heels for those irresistible Biscoff cookies with their warm spiced flavor and delightful crunch. Now imagine transforming that beloved taste into a show-stopping cake that’ll have everyone begging for the recipe. This Biscoff cake captures everything we love about those golden cookies and elevates it to dessert perfection.
Biscoff spread – that creamy caramelized cookie butter we can’t stop eating straight from the jar – becomes the star ingredient in this incredibly moist and flavorful cake. We’re talking layers of tender spiced cake paired with rich Biscoff frosting that melts on your tongue.
Whether you’re planning a special celebration or just want to treat yourself to something extraordinary this homemade Biscoff cake delivers bakery-quality results right from your own kitchen. Trust us when we say this recipe will become your new go-to dessert that’ll impress every single time.
Ingredients
These carefully selected ingredients work together to create our rich and indulgent Biscoff cake. We’ve organized them by component to make preparation smooth and efficient.
For the Cake
- 2 cups all-purpose flour
- 1½ cups granulated sugar
- ½ cup packed light brown sugar
- 1 tablespoon baking powder
- 1 teaspoon salt
- 1 teaspoon ground cinnamon
- ½ teaspoon ground ginger
- ¼ teaspoon ground nutmeg
- ¾ cup unsalted butter, softened
- 3 large eggs, room temperature
- 1 cup whole milk, room temperature
- ½ cup Biscoff spread, slightly warmed
- 2 teaspoons vanilla extract
- ½ cup crushed Biscoff cookies
For the Biscoff Buttercream
- 1 cup unsalted butter, softened
- ¾ cup Biscoff spread, room temperature
- 4 cups powdered sugar, sifted
- ¼ cup heavy cream
- 1 teaspoon vanilla extract
- ¼ teaspoon salt
- 2 tablespoons crushed Biscoff cookies for decoration
For the Biscoff Drip
- ½ cup heavy cream
- 6 oz white chocolate chips
- 3 tablespoons Biscoff spread
- 1 tablespoon light corn syrup
- Whole Biscoff cookies for garnish
Equipment Needed

Creating the perfect Biscoff cake requires exact tools that make the baking process smooth and ensure professional results. We recommend gathering all equipment before starting to streamline your baking experience.
Essential Mixing Equipment
A food processor stands as our most crucial tool for transforming Biscoff cookies into the fine powder and crumbs needed throughout this recipe. Standard mixing bowls in various sizes help organize your ingredients while keeping wet and dry components separate until ready to combine.
An electric hand mixer or stand mixer becomes indispensable for creating the signature Biscoff buttercream. These tools provide the power needed to blend butter, Biscoff spread, and powdered sugar into a smooth and aerated frosting that spreads beautifully.
Baking and Cooling Tools
Cake pans form the foundation of our baking setup. We typically use 8-inch round cake tins for layered cakes or a 9×13 inch sheet pan for simpler presentations. A cooling rack allows proper air circulation around your finished cakes before we begin decorating.
Kitchen scales ensure precise ingredient measurements, particularly important when working with Biscoff spread and powdered sugar ratios. Parchment paper or cake tin liners make removal effortless and prevent sticking.
Decorating Essentials
| Tool | Purpose | Exact Use |
|---|---|---|
| Cake scraper or angled icing spatula | Smoothing buttercream | Creating clean cake sides |
| Piping bags and nozzles | Decorative piping | Using Ateco 829 or large French tip |
| Squeeze bottle | Drizzling | Melted Biscoff spread application |
| Decorating turntable | Even icing | 360-degree cake access |
| Cake leveller | Layer preparation | Trimming uneven surfaces |
| Cake tester | Doneness check | Ensuring proper baking |
Our piping equipment allows for beautiful decorative touches using Biscoff buttercream. A decorating turntable facilitates smooth frosting application by providing easy access to all cake angles. The cake leveller ensures each layer sits perfectly flat for professional presentation.
These tools work together to maximize both flavor and visual appeal of your finished Biscoff cake. Having everything prepared beforehand allows us to focus on technique rather than searching for equipment mid-recipe.
Instructions

Now we’ll walk through the complete process of creating this spectacular Biscoff cake from start to finish. Each step builds upon the last to ensure our cake turns out perfectly moist and flavorful.
Prep the Pans and Oven
We begin by preheating our oven to 350°F (180°C). Grease two 8-inch round cake pans thoroughly with butter or cooking spray. Line the bottom of each pan with parchment paper for easy removal later. This preparation step ensures our cake layers release cleanly and maintain their shape.
Make the Cake Batter
We start with our dry ingredients by whisking together the all-purpose flour, cornstarch, baking soda, baking powder, salt, and cinnamon in a large bowl. Set this mixture aside while we prepare our wet ingredients.
In a separate large mixing bowl, we cream the butter, vegetable oil, and granulated sugar together using an electric mixer on medium speed for 3-4 minutes until the mixture becomes light and fluffy. Add eggs one at a time, beating well after each addition to ensure proper incorporation.
Next, we mix in the Biscoff spread and vanilla extract until the mixture is smooth and well combined. The Biscoff spread adds that signature cookie flavor throughout our cake.
We now alternate adding our dry ingredients and buttermilk to the wet mixture. Begin by folding in half of the flour mixture using a spatula, followed by all the buttermilk, then finish with the remaining flour mixture. Mix gently just until combined to avoid overmixing, which can result in a tough cake.
Finally, we fold in our crushed Biscoff cookies, distributing them evenly throughout the batter for delightful cookie pieces in every bite.
Bake the Cake Layers
Divide the batter evenly between our prepared cake pans, using a kitchen scale for the most accurate distribution. Smooth the tops gently with an offset spatula.
Bake for 30-40 minutes, rotating the pans halfway through for even browning. Our cakes are done when a toothpick inserted in the center comes out clean or with just a few moist crumbs attached.
Remove the cakes from the oven and let them cool in their pans for 10 minutes before turning them out onto wire cooling racks. Allow the layers to cool completely before frosting, which typically takes about 2 hours.
Prepare the Biscoff Buttercream
We create our luscious buttercream by beating the unsalted butter in a large bowl with an electric mixer on medium speed until light and fluffy, about 3-4 minutes. Add the Biscoff spread and continue beating until well incorporated.
Gradually add the powdered sugar, one cup at a time, beating well after each addition. Pour in the heavy cream, vanilla extract, and salt, then beat on high speed for 2-3 minutes until the buttercream is smooth and pipeable.
The consistency should be creamy enough to spread easily but thick enough to hold its shape when piped. Adjust with additional cream if too thick or more powdered sugar if too thin.
Make the Biscoff Drip
For our signature drip, we heat the heavy cream in a small saucepan over medium heat until it just begins to simmer. Remove from heat and add the white chocolate chips, stirring until completely melted and smooth.
Whisk in the Biscoff spread and light corn syrup until the mixture is glossy and well combined. The drip should coat the back of a spoon but still flow easily. Let it cool for 5-10 minutes before using, stirring occasionally to prevent a skin from forming.
Test the consistency by dripping a small amount down the side of a glass. The perfect drip flows slowly and stops naturally without being too thick or too runny.
Assembly

With our cake layers cooled and buttercream ready, we’ll now bring together all the elements to create a stunning Biscoff masterpiece. The assembly process involves careful layering and decorating techniques that transform our simple cake layers into a bakery-quality dessert.
Level and Layer the Cake
We begin by leveling our cooled cake layers using a serrated knife to ensure even stacking. Trimming the caramelized edges remains optional depending on our desired presentation style. Place the first leveled cake layer on a cake stand and add a generous amount of Biscoff buttercream frosting on top. Using an offset spatula or knife, we smooth the frosting evenly across the surface. Create a frosting dam around the edges of the cake layer using a piping tip to contain additional fillings and prevent overflow during assembly.
Apply the Buttercream
Fill the center of our frosted layer with a portion of Biscoff spread, ensuring the spread maintains room temperature to prevent melting the buttercream underneath. Position the next cake layer on top and repeat the layering process with more buttercream and Biscoff spread. Cover the entire cake’s top and sides with the remaining buttercream, reserving some for final piping details. We achieve a professional finish by smoothing the sides using a cake scraper while rotating the cake stand slowly.
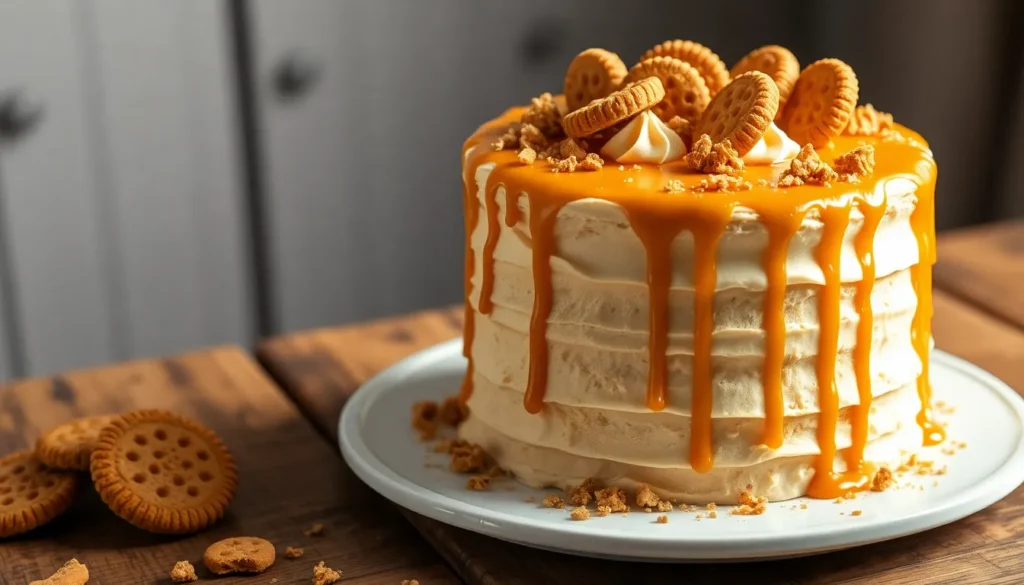
Add the Biscoff Drip
Heat Biscoff spread until it reaches a runny consistency by gently warming it or microwaving in short bursts while stirring between intervals. Using a spoon, we carefully drip the warmed spread down the sides of the cake, creating an elegant cascading effect. Spread some of the warm Biscoff mixture on top of the cake for complete coverage. Allow the drip to set properly by chilling the assembled cake in the refrigerator if the kitchen temperature is warm.
Final Decorations
Pipe a buttercream border around the top edge of our cake using a piping tip for a polished appearance. Add the remaining Biscoff spread to the center of the top layer for extra richness and visual appeal. For enhanced decoration, we place whole Biscoff cookies, cookie crumbs, or homemade Biscoff truffles on top of the cake. Some bakers recommend adding a light sprinkle of cinnamon or extra cookie crumbles for additional texture and visual interest that complements the warm spiced flavors.
| Assembly Tips | Details |
|---|---|
| Chilling Time | Chill cake layers before assembly for easier handling |
| Biscoff Temperature | Keep spread at spreadable but not warm temperature |
| Setting Time | Allow drip layer to set completely before serving |
Make-Ahead Instructions

Planning ahead makes creating our Biscoff cake effortless for special occasions or busy schedules. We can prepare several components days in advance without compromising the final result.
Cake Layers Storage
Our cake layers maintain optimal freshness when stored properly after baking. We wrap each completely cooled layer individually in plastic wrap and store them at room temperature for up to three days. This method preserves moisture while preventing the layers from drying out. Alternatively, we place the wrapped layers in airtight containers for the same storage duration.
Freezing for Extended Storage
Longer storage requires freezing our cake layers for maximum convenience. We wrap each layer in plastic wrap followed by aluminum foil to prevent freezer burn. Frozen cake layers remain fresh for up to two months when stored this way. Thawing happens naturally at room temperature while keeping the layers wrapped to maintain moisture.
Advance Frosting and Filling Preparation
Our Biscoff buttercream and ganache components benefit from advance preparation. We store prepared frosting and fillings in the refrigerator for several days before use. Room temperature restoration occurs by removing these components from refrigeration about 30 minutes before assembly. This timing ensures smooth spreading consistency and easier application.
Strategic Assembly Timing
Final assembly happens just before serving to maintain optimal texture and visual appeal. We combine all pre-made components at this stage to prevent moisture from affecting the cake’s structure. Fresh assembly preserves the crisp contrast between our moist cake layers and creamy Biscoff elements while ensuring the decorative drip maintains its elegant appearance.
Storage Tips

Proper storage keeps our Biscoff cake fresh and delicious for days or even months. We’ve found that different storage methods work best depending on whether the cake is whole or sliced and how long we need to preserve it.
Room Temperature Storage
Our whole frosted Biscoff cake stays perfectly fresh at room temperature for 2–4 days when stored in an airtight container. The key is preventing air exposure that causes the cake to dry out. We always make sure the cake has cooled completely before covering it with a cake dome or placing it in a sealed container.
When we’ve already sliced the cake, we cover any exposed sections with leftover frosting to maintain moisture. This simple step prevents the cut edges from becoming stale or hard.
Refrigeration Method
Once we slice our Biscoff cake, refrigeration becomes the best storage option. We place individual slices or the remaining cake in an airtight container or under a cake dome. Refrigerated cake maintains its quality for up to 1 week, though we recommend consuming it within this timeframe for optimal taste and texture.
| Storage Method | Duration | Best For |
|---|---|---|
| Room Temperature | 2-4 days | Whole, frosted cake |
| Refrigeration | Up to 1 week | Sliced cake portions |
| Freezing | Up to 3 months | Long-term storage |
Freezing for Long-Term Storage
For extended storage, we wrap individual cake slices in parchment paper or plastic wrap before placing them in freezer-safe containers. This double protection prevents freezer burn and maintains the cake’s moisture for up to 3 months.
We have a special technique for frosted slices: we place them in the freezer uncovered for 5 minutes to firm up the frosting before wrapping. This prevents the frosting from smudging during the wrapping process. When we’re ready to serve, we simply thaw the slices at room temperature.
Make-Ahead Storage Tips
Our Biscoff buttercream stores beautifully in the refrigerator for up to 1 week or in the freezer for up to 3 months. We always bring refrigerated frosting to room temperature and re-whip it before using to restore its smooth, pipeable consistency.
Cake layers can be baked and frozen before assembly, making our preparation more flexible. We wrap cooled layers individually and freeze them for easy access when we’re ready to assemble our masterpiece.
Serving Suggestions

Our Biscoff cake transforms any gathering into a memorable occasion with its stunning presentation and irresistible flavor. We recommend serving this decadent dessert at room temperature to allow the Biscoff spread layers to achieve their optimal creamy texture. The cake pairs beautifully with freshly brewed coffee or espresso, as the warm spiced notes complement the caramelized cookie flavors perfectly.
For special celebrations, we love creating an impressive dessert table centerpiece by placing the cake on an elevated stand. The golden Biscoff drip cascading down the sides creates a naturally elegant appearance that draws guests’ attention. We suggest cutting generous slices using a sharp knife warmed under hot water and wiped clean between cuts to ensure clean edges through the buttercream layers.
The rich flavor profile makes this cake ideal for autumn gatherings, holiday parties, and birthday celebrations. We recommend pairing each slice with a dollop of vanilla ice cream or lightly whipped cream to balance the intense Biscoff flavors. For coffee lovers, a small cup of strong espresso alongside creates the perfect flavor harmony.
When serving at parties, we find that smaller portions work best due to the cake’s rich nature. A standard slice serves one person generously, but consider cutting thinner portions for dessert buffets or after heavy meals. The cake’s moist texture and bold flavors satisfy even the most discerning dessert enthusiasts with just a few bites.
For casual family dinners, we enjoy serving the cake with fresh berries or a light fruit salad to add brightness that complements the deep caramelized notes. The contrast between the sweet, spiced cake and tart fruit creates a well balanced dessert experience that cleanses the palate beautifully.
Conclusion
This Biscoff cake transforms the beloved cookie spread into an extraordinary dessert that’s both approachable and impressive. We’ve equipped you with everything needed to create bakery-quality results at home – from detailed ingredient lists to professional assembly techniques.
The make-ahead options and storage tips we’ve shared make this cake perfect for any schedule. Whether you’re planning for a special celebration or treating yourself to something extraordinary the flexibility built into this recipe ensures success every time.
With proper technique and attention to detail you’ll create a show-stopping dessert that delivers on both flavor and presentation. Your guests will be amazed by the rich spiced layers creamy buttercream and that signature Biscoff drip that makes this cake truly unforgettable.
Frequently Asked Questions
What makes Biscoff cake different from regular cake?
Biscoff cake features the distinctive warm spiced flavor of Biscoff cookies and spread throughout both the cake layers and frosting. The addition of crushed Biscoff cookies provides texture, while Biscoff spread creates exceptional moisture and rich flavor that regular cakes lack.
Can I make Biscoff cake ahead of time?
Yes! You can bake cake layers and freeze them for up to 3 months, or store at room temperature for 2 days. Buttercream can be made a week ahead and refrigerated. However, final assembly should be done just before serving for best results.
How long does Biscoff cake stay fresh?
A whole frosted Biscoff cake stays fresh at room temperature for 2-4 days when stored in an airtight container. Individual slices can be refrigerated for up to a week or frozen for up to 3 months for longer storage.
What equipment do I need to make Biscoff cake?
Essential tools include a food processor for crushing cookies, electric mixer for buttercream, cake pans, cooling racks, and kitchen scale. For decorating, you’ll need a cake scraper, piping bags, squeeze bottle, and decorating turntable for professional results.
Can I substitute Biscoff spread with something else?
While Biscoff spread provides the signature flavor, you could substitute with speculoos spread or cookie butter. However, the unique caramelized cookie taste of Biscoff is what makes this cake special, so substitutions will alter the authentic flavor profile.
How do I achieve the perfect Biscoff drip?
Warm the Biscoff drip mixture until smooth but not hot. Test the consistency on the side of a bowl first. The mixture should flow slowly but not be too thin. Let it cascade naturally down the cake sides for an elegant finish.
What’s the best way to serve Biscoff cake?
Serve at room temperature to enhance the creamy texture. It pairs beautifully with coffee or espresso. Cut generous slices and consider serving with vanilla ice cream or fresh berries to balance the rich, spiced flavors.


