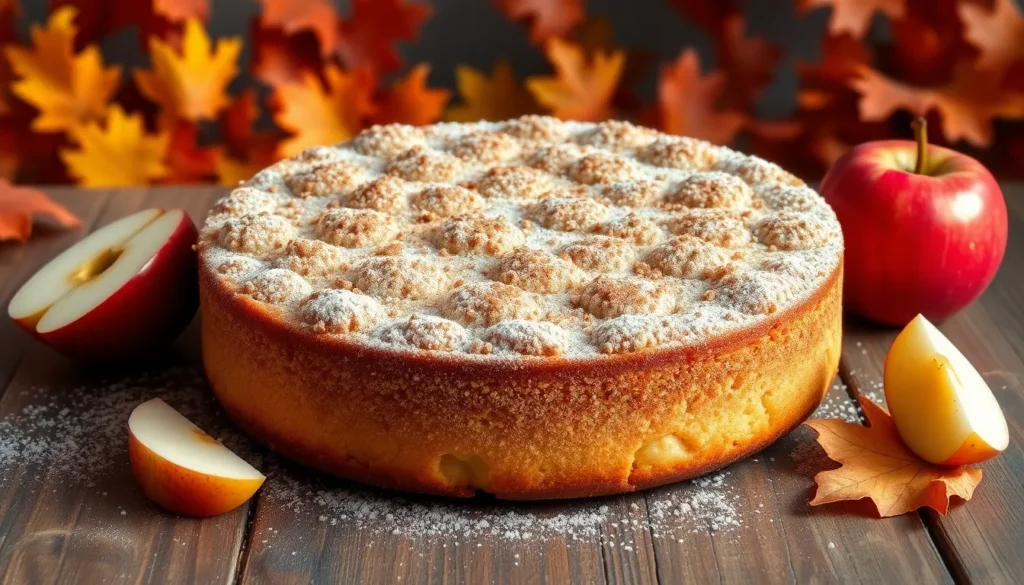
Nothing beats the aroma of fresh cinnamon and apples wafting through your kitchen on a crisp autumn afternoon. This cinnamon apple cake captures everything we love about fall in one irresistible dessert that’s surprisingly simple to make at home.
We’ve perfected this recipe to deliver the ultimate balance of tender, juicy apple pieces and warm cinnamon spice in every bite. The cake’s moist crumb and golden-brown top make it equally perfect for weekend brunches or weeknight treats with your favorite cup of coffee.
What makes this recipe special is how it transforms everyday pantry staples into something truly magical. You’ll be amazed at how a handful of basic ingredients creates such rich, complex flavors that rival any bakery creation. Let’s jump into this foolproof recipe that’ll become your new go-to dessert.
Ingredients
We’ve organized our ingredients into three simple categories to make your baking process seamless and stress-free. Each component plays a crucial role in creating this irresistible cinnamon apple cake.
For the Cake
- 2 cups all-purpose flour
- 1 cup granulated sugar
- 1/2 cup brown sugar, packed
- 1/2 cup unsalted butter, melted
- 2 large eggs, room temperature
- 1 cup whole milk
- 2 teaspoons vanilla extract
- 1 1/2 teaspoons baking powder
- 1/2 teaspoon salt
- 1 teaspoon ground cinnamon
- 3 medium Granny Smith apples, peeled and diced into 1/2-inch pieces
- 1 tablespoon flour for coating apples
For the Cinnamon Sugar Topping
- 1/3 cup brown sugar, packed
- 1 teaspoon ground cinnamon
- 2 tablespoons cold unsalted butter, cubed
- 1/4 cup all-purpose flour
For the Glaze (Optional)
- 1 cup powdered sugar, sifted
- 3-4 tablespoons whole milk
- 1/2 teaspoon vanilla extract
- Pinch of salt


Equipment Needed

Our cinnamon apple cake requires essential baking equipment that most home bakers already have in their kitchens. We recommend gathering these tools before starting to ensure smooth preparation and professional results.
Baking Pan: We prefer using a 9×9 inch or 9×13 inch baking pan for optimal cake thickness and even cooking. The 9×9 pan creates a thicker cake perfect for smaller gatherings while the 9×13 pan works well for larger groups or potluck events.
Large Mixing Bowls: We need at least two large mixing bowls to keep wet and dry ingredients separated during preparation. This separation technique prevents overmixing and ensures our cake maintains its tender texture.
Measuring Tools: Accurate measuring cups and spoons are crucial for achieving consistent results every time we bake. We recommend having both dry and liquid measuring cups for precise ingredient portions that guarantee our cake’s perfect balance of flavors.
Electric Mixer: While optional, an electric hand mixer or stand mixer significantly reduces mixing time and creates a smoother batter. We find that thorough mixing with an electric mixer produces better incorporation of ingredients and a more uniform cake texture.
Basic Utensils: A wire whisk helps us combine dry ingredients evenly while a rubber spatula allows gentle folding of apple pieces without breaking them. These simple tools make the difference between amateur and professional baking results.
Preparation Tools: We need a sharp knife for dicing apples and a cutting board for safe prep work. Having all cutting completed before mixing ensures our batter doesn’t sit too long before baking.


Prep Work

Proper preparation sets the foundation for our perfect cinnamon apple cake. We’ll focus on two crucial steps that ensure our cake bakes evenly and develops those irresistible flavors.
Preparing the Apples
We start by peeling, coring, and slicing 3-4 apples to yield approximately 4 cups of prepared fruit. Our apple slices should be uniform in thickness to ensure even baking throughout the cake.
Next, we toss the freshly sliced apples with sugar and 1 tablespoon of lemon juice in a large mixing bowl. This combination works to soften the apples naturally while dissolving the sugar completely. The lemon juice prevents browning and adds a subtle brightness that complements the warm cinnamon.
Allow this apple mixture to sit undisturbed for 30-45 minutes before incorporating it into our batter. During this resting period, the apples release their natural juices and create a lightly sweetened syrup that will infuse our cake with incredible flavor.
Preparing the Pan
We have flexible options for pan sizes depending on our desired cake thickness. An 8-inch round cake pan creates a taller cake, while a 9×9 or 9×13 inch baking dish produces a thinner, more bar-like texture.
Start by generously greasing our chosen pan with butter or cooking spray, ensuring we coat all corners and edges thoroughly. We then line the bottom and sides with parchment paper, leaving slight overhang for easy removal after baking.
This double protection method prevents sticking and allows us to lift our finished cake cleanly from the pan. The parchment paper acts as insurance against any stubborn spots that might cling to the pan surface.


Instructions

We’ll guide you through each step of creating this delicious cinnamon apple cake. These detailed instructions ensure perfect results every time.
Making the Cake Batter
Preheat your oven to 350°F (180°C) for a standard oven or 320°F (160°C) for a fan-forced oven. We begin by combining all dry ingredients in a large mixing bowl. Mix the flour, baking powder, baking soda, salt, and granulated sugar together until evenly distributed.
Create the wet ingredient mixture in a separate bowl by whisking together the eggs, vanilla extract, oil, and yogurt. Beat these ingredients until smooth and well combined. The yogurt adds moisture and creates a tender crumb texture that makes this cake exceptional.
Adding the Apples
Take your prepared apple mixture that has been sitting with sugar and lemon juice for 30-45 minutes. The apples should now be slightly softened and release their natural juices. Add these diced apples directly to the dry ingredient bowl and gently toss to coat them with the flour mixture.
This flour coating prevents the apples from sinking to the bottom during baking. We recommend using about 3-4 apples depending on their size to achieve the perfect apple-to-batter ratio.
Creating the Cinnamon Topping
Combine the brown sugar, ground cinnamon, and cold butter pieces in a small bowl. Use your fingertips or a pastry cutter to work the ingredients together until you create a lumpy, crumbly mixture. The butter should remain in small pieces rather than being completely smooth.
This streusel-like topping will create a delightful crunchy layer on top of your cake while adding extra cinnamon flavor.
Assembly and Baking
Pour the wet ingredients into the bowl containing the dry ingredients and apples. Gently fold everything together using a rubber spatula until just combined. Avoid overmixing as this can result in a tough cake texture.
Transfer the batter into your prepared greased cake pan, spreading it evenly with your spatula. Sprinkle the cinnamon topping mixture over the entire surface of the batter. Bake for 30-35 minutes for a round cake or 50-60 minutes for a bundt cake.
Test for doneness by inserting a skewer or toothpick into the center of the cake. The cake is ready when the skewer comes out clean or with just a few moist crumbs attached.


Baking Tips for Perfect Results

We’ve discovered that maintaining the proper oven temperature throughout baking ensures even cooking and prevents dense or undercooked centers. Our ovens should reach exactly 350°F before placing the cake inside, and we recommend using an oven thermometer to verify accuracy since many home ovens run hot or cold.
Apple preparation makes the difference between a soggy bottom and perfectly textured cake. We always peel and core our apples completely, then dice them into uniform pieces about half an inch in size. Coating these apple pieces with sugar and lemon juice before mixing creates a natural syrup that prevents browning while adding moisture to every bite.
Batter consistency requires gentle handling to achieve that tender crumb we all crave. We mix our wet ingredients thoroughly in one bowl and combine all dry ingredients in another, then fold them together just until incorporated. Overmixing develops the gluten in flour, resulting in a tough, dense cake that disappoints every time.
Pan preparation prevents the heartbreak of a stuck cake that breaks apart during removal. We grease our chosen pan thoroughly with butter, then line it with parchment paper for foolproof release. Different pan sizes affect baking times significantly, so we adjust accordingly.
| Pan Size | Baking Time | Expected Texture |
|---|---|---|
| 8-inch round | 30-35 minutes | Thick, tall cake |
| 9×9-inch square | 35-40 minutes | Medium thickness |
| 9×13-inch rectangular | 25-30 minutes | Thinner, sheet cake style |
| Bundt pan | 45-60 minutes | Dense, moist texture |
Testing for doneness requires more than just timing since ovens vary. We insert a toothpick or thin knife into the center of the cake, looking for it to come out clean or with just a few moist crumbs attached. The cake should also spring back lightly when touched and pull slightly away from the pan edges.
Cooling methodology impacts the final texture of our finished cake. We allow the cake to rest in its pan for exactly 10 minutes after removing from the oven, then transfer it to a wire cooling rack. This prevents condensation from making the bottom soggy while ensuring the cake doesn’t break apart from being moved too quickly.
Fresh apple selection dramatically influences flavor and texture outcomes. We choose firm varieties like Granny Smith that hold their shape during baking rather than turning to mush. Quality ground cinnamon provides that warm, aromatic essence that defines this classic dessert, so we avoid using stale spices that have lost their potency.
Cooling and Glazing

Cooling the Cake
We transfer our finished cinnamon apple cake to a wire rack immediately after removing it from the oven. Air circulation around the entire cake prevents sogginess and ensures even cooling throughout. The cake needs to cool completely on the rack before we add any glaze to prevent melting or uneven coverage.
Glazing Options
Our glazing options transform this already delicious cake into a bakery-worthy dessert. We recommend three different approaches based on your flavor preferences and available ingredients.
Simple Sugar Glaze creates the most basic yet elegant finish. We mix powdered sugar with milk until smooth, adjusting the consistency by adding milk in small increments. This glaze provides a sweet contrast to the spiced cake without overwhelming the apple and cinnamon flavors.
Cinnamon Glaze amplifies the warm spice profile throughout every bite. We add ground cinnamon to our sugar and milk mixture, creating a cohesive flavor experience that enhances the cake’s existing cinnamon notes.
Caramel Glaze offers the richest option for special occasions. We combine butter, milk, and brown sugar in a saucepan, heating until the sugar dissolves completely and the mixture reaches a rolling boil. After removing from heat, we let it cool slightly before drizzling to achieve the perfect consistency.
Glazing Application
Consistency determines the success of our glazing technique. We ensure the glaze flows smoothly without being too runny or thick, allowing it to coat the cake surface evenly without pooling excessively in corners.
Timing plays a crucial role in achieving professional results. We wait until the cake reaches room temperature before applying any glaze, preventing unwanted melting or sliding.
Presentation elevates the final appearance through careful application. We drizzle the glaze in decorative patterns across the cake surface, creating visual appeal that matches the exceptional taste of our cinnamon apple creation.


Storage Instructions

We recommend storing your cinnamon apple cake properly to maintain its fresh flavor and moist texture for several days. Our storage methods ensure you can enjoy this delicious cake at its best quality.
Room Temperature Storage
Store the cooled cake in an airtight container at room temperature for optimal freshness. This method preserves the cake’s texture and flavor for 2 to 3 days. We always cover the cake completely to prevent moisture loss and maintain that tender crumb we worked so hard to achieve.
Refrigerated Storage
Refrigeration extends the cake’s lifespan significantly when stored in an airtight container. Your cinnamon apple cake will stay fresh for 4 to 7 days in the refrigerator. The cool temperature slows mold growth and preserves moisture though the texture may become slightly denser than room temperature storage.
Freezing for Long-Term Storage
Wrap individual slices or the entire cake tightly in plastic wrap followed by aluminum foil for freezer storage. We recommend using an airtight container as an alternative wrapping method. Properly wrapped cinnamon apple cake maintains quality for up to 3 months in the freezer.
| Storage Method | Duration | Container Type |
|---|---|---|
| Room Temperature | 2-3 days | Airtight container |
| Refrigerated | 4-7 days | Airtight container |
| Frozen | 3 months | Plastic wrap + foil or airtight container |
Serving After Storage
Allow refrigerated cake to come to room temperature before serving for the best flavor experience. We suggest warming chilled slices briefly in the microwave if you prefer a slightly warm cake. Thaw frozen cake portions in the refrigerator overnight before bringing to room temperature.
Presentation Tips
Dust the cake with powdered sugar just before serving to refresh its appearance. We recommend adding a simple vanilla glaze after storage to restore that bakery-fresh look. These finishing touches make stored cake look as appealing as freshly baked.


Serving Suggestions

Our cinnamon apple cake shines as a versatile dessert that adapts beautifully to any occasion. We love serving this cake warm from the oven when the cinnamon aroma fills the kitchen and the tender apple pieces are at their most flavorful peak.
As a Standalone Dessert
This cake delivers incredible satisfaction when enjoyed on its own. The moist crumb and cinnamon sugar topping create a perfect balance of textures that needs no accompaniment. We often serve generous squares during afternoon gatherings or as a comforting end to family dinners.
Enhanced with Creamy Accompaniments
Pairing our cake with whipped cream transforms it into an elegant dessert worthy of special occasions. The light and airy cream provides a delightful contrast to the dense apple filled cake. Vanilla ice cream creates another winning combination that appeals to all ages. We recommend serving the ice cream slightly softened to complement the cake’s temperature.
Perfect with Warm Beverages
Our cinnamon apple cake pairs exceptionally well with hot beverages that enhance its cozy appeal. A steaming cup of coffee brings out the cake’s rich flavors while tea creates a more delicate pairing. We particularly enjoy serving this combination during chilly autumn afternoons or winter evenings.
Elevated Presentation Ideas
Transform your cake into a showstopping dessert with simple finishing touches. Dusting the surface with powdered sugar adds visual appeal and a touch of sweetness. Drizzling warm caramel sauce over individual slices creates an indulgent treat that impresses guests. We often reserve these elaborate presentations for holiday gatherings or dinner parties where the extra effort makes a memorable impression.
The beauty of this cake lies in its ability to satisfy whether served simply or dressed up for special occasions. Each serving method highlights different aspects of the cake’s wonderful flavors and textures.


Recipe Variations

Our cinnamon apple cake adapts beautifully to different dietary needs without sacrificing flavor or texture. We’ve tested these variations extensively to ensure every version delivers the same delicious results.
Gluten-Free Option
We recommend substituting the all-purpose flour with a high-quality gluten-free flour blend for the best results. Bob’s Red Mill 1-to-1 Baking Flour or King Arthur Gluten-Free Measure for Measure Flour work exceptionally well in this recipe. Use the same measurement as regular flour called for in the original recipe.
Rice flour blends create a tender crumb while almond flour adds richness and moisture to the cake. We suggest adding an extra 1/4 teaspoon of xanthan gum if your chosen blend doesn’t already contain it. This helps bind the ingredients and prevents the cake from becoming crumbly.
The baking time may increase by 5-10 minutes when using gluten-free flour. We always test for doneness with a toothpick inserted into the center. The cake is ready when the toothpick comes out with just a few moist crumbs attached.
Dairy-Free Alternative
Replace the whole milk with your preferred plant-based alternative using a 1:1 ratio. Oat milk provides the richest flavor and creamy texture that closely mimics dairy milk. Almond milk works well too but may result in a slightly less moist cake.
Substitute the unsalted butter with vegan butter or refined coconut oil for the cake batter. We recommend using solid coconut oil at room temperature rather than melted for better texture. Vegan butter brands like Earth Balance or Miyoko’s produce excellent results.
For the cinnamon topping we use cold vegan butter cut into small pieces. This creates the same crumbly texture as traditional butter. The glaze adapts easily by replacing regular milk with plant-based milk of your choice.
| Dairy Ingredient | Dairy-Free Substitute | Measurement |
|---|---|---|
| Whole milk | Oat milk or almond milk | 1:1 ratio |
| Unsalted butter | Vegan butter or coconut oil | 1:1 ratio |
| Milk (for glaze) | Plant-based milk | 1:1 ratio |


Conclusion
We’ve shared everything you need to create this irresistible cinnamon apple cake that’ll fill your kitchen with the most amazing aromas. This recipe delivers consistent results every time and we’re confident it’ll become one of your go-to favorites for fall baking.
Whether you’re hosting a weekend brunch or simply craving a cozy dessert the versatility of this cake makes it perfect for any occasion. The combination of tender apples warm cinnamon and that delightful crunch topping creates a treat that’s simply unforgettable.
Now it’s time to gather your ingredients and start baking! We can’t wait for you to experience the joy of pulling this golden beauty from your oven and sharing it with the people you love most.
Frequently Asked Questions
What type of apples work best for cinnamon apple cake?
Granny Smith apples are ideal for this cake because they hold their shape well during baking and provide a perfect tart contrast to the sweet cake. Their firm texture prevents them from becoming mushy, and their acidity balances the sweetness beautifully. You can also use Honeycrisp or Braeburn apples for similar results.
How long does cinnamon apple cake stay fresh?
When stored properly in an airtight container, cinnamon apple cake stays fresh at room temperature for 2-3 days, in the refrigerator for 4-7 days, or frozen for up to 3 months. For best flavor and texture, allow refrigerated cake to come to room temperature before serving.
Can I make this cake gluten-free?
Yes! Simply substitute the all-purpose flour with a high-quality gluten-free flour blend in a 1:1 ratio. Make sure your blend contains xanthan gum for proper texture. The cake will maintain its tender crumb and delicious flavor with this simple substitution.
What pan size should I use for cinnamon apple cake?
A 9×9 inch pan creates a thicker cake with longer baking time, while a 9×13 inch pan produces a thinner cake that bakes faster. Both work perfectly – choose based on your preference for cake thickness. Always grease and line your pan with parchment paper to prevent sticking.
Do I need to peel the apples for this cake?
Yes, peeling the apples is recommended for the best texture. Peeled apples integrate better into the batter and create a more tender bite. Dice them into small, uniform pieces and toss with sugar and lemon juice to prevent browning and enhance flavor.
Can I make cinnamon apple cake dairy-free?
Absolutely! Replace whole milk with your favorite plant-based milk (almond, oat, or soy work well) and substitute unsalted butter with vegan butter or melted coconut oil. These swaps maintain the cake’s moisture and flavor while making it dairy-free friendly.
How do I know when the cake is done baking?
Insert a toothpick into the center of the cake – it should come out with just a few moist crumbs attached. The cake should also spring back lightly when touched and start pulling away slightly from the pan edges. Baking times vary by pan size.
Should I glaze the cake while it’s warm or cool?
Always glaze the cake when it has cooled to room temperature. Glazing a warm cake will cause the glaze to melt and run off, creating a messy appearance. Room temperature cake allows the glaze to set properly and create an attractive finish.


