We’ve discovered the perfect balance between simplicity and satisfaction with this easy oat slice recipe that’ll become your go-to treat for any occasion. This classic slice brings together wholesome oats, butter, and golden syrup to create a chewy, golden masterpiece that’s impossible to resist.
What makes this oat slice truly special is its versatility – it’s equally at home packed in lunchboxes, served with afternoon tea, or enjoyed as a quick breakfast on busy mornings. The beauty lies in its straightforward preparation that requires just basic pantry ingredients and minimal fuss.
We love how this recipe delivers consistent results every time, creating that perfect chewy texture with crispy edges that everyone craves. Whether you’re a baking novice or seasoned pro, this foolproof oat slice will have you confidently creating batches that disappear as quickly as you can make them.
Ingredients
We’ve carefully selected ingredients that work together to create the perfect balance of texture and flavor in our easy oat slice. These pantry staples ensure consistent results every time we bake this beloved treat.
For the Base
- 2 cups rolled oats
- 1 cup plain flour
- 1 cup brown sugar (firmly packed)
- 1 cup desiccated coconut
- 125g butter (melted)
- 2 tablespoons golden syrup
- 1 teaspoon baking soda
- 2 tablespoons boiling water
For the Topping
- 1 cup jam or preserves (any flavor of choice)
- 1/2 cup rolled oats (extra for sprinkling)
- 2 tablespoons desiccated coconut (extra for texture)


Equipment Needed
 1")
Creating our perfect oat slice requires minimal kitchen equipment that most home bakers already have on hand. We believe in keeping things simple so you can focus on achieving those beautiful golden results.
Essential Baking Equipment
- Large mixing bowl – We need adequate space to combine all our dry ingredients thoroughly without spillage
- 8-inch x 8-inch baking tin – This size provides the ideal thickness for our oat slice while ensuring even cooking
- Parchment paper – Essential for easy removal and preventing sticking to the tin
- Medium saucepan – Perfect for melting butter and combining with golden syrup
Measuring and Mixing Tools
- Measuring cups and spoons – Accuracy matters for consistent results with our brown sugar and coconut ratios
- Wooden spoon or whisk – We prefer wooden spoons for their gentle mixing action that won’t overwork our oat mixture
- Small bowl – Useful for dissolving baking soda in boiling water before adding to our mixture
Optional but Helpful Items
- Kitchen scales – While cup measurements work perfectly we find weighing ingredients like our 125g butter portion ensures precision
- Pastry brush – Handy for spreading jam evenly across the base layer
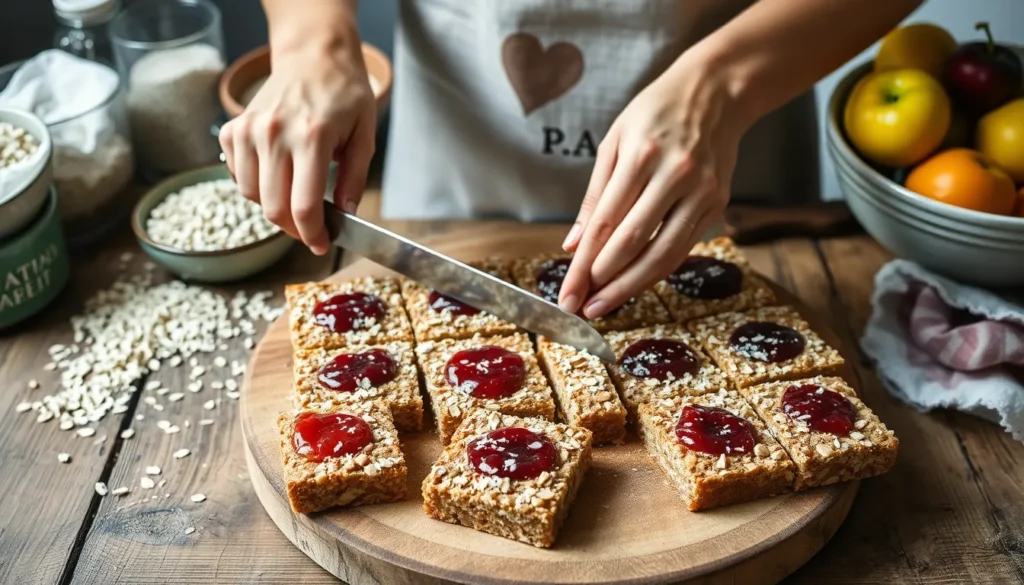
- Sharp knife – Clean cuts through our cooled slice create professional looking squares
Having these tools ready before we start makes the entire process flow smoothly from mixing to baking to serving our delicious homemade oat slice.


Instructions
 2")
We’ll walk you through each step to create the perfect oat slice that delivers consistent results every time. Our method ensures you achieve that ideal combination of chewy texture and golden crispy edges.
Prep the Pan and Oven
Preheat your oven to 350°F (180°C) before starting any mixing. Line your 8-inch x 8-inch baking tin with parchment paper, leaving some overhang for easy removal later. This preparation step ensures even baking and prevents sticking.
Make the Oat Base
Combine 2 cups rolled oats, 1 cup plain flour, 1 cup firmly packed brown sugar, and 1 cup desiccated coconut in your large mixing bowl. Whisk these dry ingredients together until evenly distributed.
Heat 125g butter and 2 tablespoons golden syrup in your medium saucepan over low heat until melted and combined. Remove from heat and let cool slightly.
Mix 1 teaspoon baking soda with 2 tablespoons boiling water in a small bowl until dissolved. Add this mixture to the melted butter and syrup, stirring quickly as it will foam up.
Prepare the Filling
Measure out 1 cup of your chosen jam or preserves into a bowl. Any flavor works beautifully, though strawberry and apricot create classic results. Set aside the extra 1/2 cup rolled oats and 2 tablespoons desiccated coconut for the topping layer.
Assemble the Slice
Pour the butter mixture into the dry ingredients and stir with a wooden spoon until well combined. The mixture should hold together when pressed.
Press half of the oat mixture firmly into your prepared baking tin using the back of a spoon or your hands. Spread the jam evenly over this base layer, leaving a small border around the edges.
Sprinkle the remaining oat mixture over the jam layer, then top with the extra 1/2 cup rolled oats and 2 tablespoons desiccated coconut for added texture.
Bake to Perfection
Bake for 25-30 minutes until the edges turn golden brown and the top feels firm to touch. The center should still have a slight give when gently pressed.
Allow the slice to cool completely in the tin before cutting into squares. This cooling period helps the layers set properly and makes cutting cleaner. Use the parchment paper overhang to lift the entire slice out before cutting for the neatest results.


Cooling and Cutting Tips
 3")
Proper cooling and cutting techniques ensure our oat slice maintains its perfect texture and holds together beautifully when served. We recommend following these essential steps to achieve clean cuts and preserve the slice’s structural integrity.
Initial Cooling Process
Allow the oat slice to cool in the pan for approximately 10 minutes after removing it from the oven. This brief cooling period helps the slice begin to set while remaining warm enough to release easily from the parchment paper. We then transfer the slice to a wire rack to complete the cooling process.
Complete Cooling Requirements
Patience proves crucial during this stage as we must let the oat slice cool completely before attempting to cut it. The slice continues to firm up as it cools, which prevents breaking apart and ensures each piece maintains its intended shape. Rushing this process often results in crumbly pieces that fall apart when handled.
Cutting Technique
Once fully cooled, we cut the oat slice into squares or bars according to our preferred serving size. The slice hardens significantly during cooling, making it much easier to handle and creating clean edges with each cut. Sharp knife strokes work best for achieving professional looking portions.
Enhanced Cooling Methods
For variations containing loose toppings or particularly soft centers, we recommend refrigerating the slice for 30 minutes before cutting. This additional chilling time helps bind all components together and creates even firmer results. Some bakers prefer freezing berry topped versions briefly to achieve optimal cutting consistency.
| Cooling Method | Time Required | Best For |
|---|---|---|
| Pan cooling | 10 minutes | Initial setting |
| Wire rack cooling | 45-60 minutes | Complete cooling |
| Refrigerator chilling | 30 minutes | Loose toppings |
| Freezer firming | 15 minutes | Berry variations |
Storage Instructions
 4")
Proper storage ensures our oat slice maintains its delicious texture and flavor for days to come. We recommend storing the completely cooled slice in an airtight container at room temperature for up to 3 to 4 days for optimal freshness.
Room Temperature Storage
Our oat slice performs exceptionally well when stored at room temperature in a sealed container. The slice remains fresh and maintains its perfect chewy texture for 3 to 4 days when properly contained. Some variations of this recipe can extend storage time up to 5 days in an airtight container either at room temperature or in the refrigerator.
Refrigerator Storage
We find that refrigerator storage works particularly well for jam-filled varieties that benefit from cooler temperatures. Store the sliced pieces in an airtight container in the refrigerator for up to 5 days. This method helps preserve the jam filling while maintaining the oat base’s integrity.
Freezer Storage for Extended Freshness
Freezing offers the best solution for long-term storage of our oat slice. We recommend wrapping individual pieces in plastic wrap before placing them in airtight containers or freezer bags. Properly stored frozen oat slice maintains quality for up to 3 months.
| Storage Method | Duration | Container Type |
|---|---|---|
| Room Temperature | 3-4 days | Airtight container |
| Refrigerator | Up to 5 days | Airtight container |
| Freezer | Up to 3 months | Freezer bags or airtight containers |
Thawing and Serving
Thawing frozen oat slice requires overnight refrigeration for best results. We place the frozen pieces in the refrigerator and allow them to defrost slowly overnight. Once thawed completely the slice cannot be refrozen so we recommend thawing only the portions needed for immediate consumption.
Critical Cooling Tips
Allowing our oat slice to cool for 15 minutes before transferring to a wire rack prevents the texture from becoming too hard. Complete cooling ensures clean cuts and proper storage preparation. We always wait for the slice to reach room temperature before placing it in any storage container to prevent condensation buildup.


Variations and Substitutions
 5")
Our easy oat slice recipe serves as the perfect foundation for countless creative adaptations. We can easily customize this versatile treat to match different flavor preferences and dietary requirements.
Flavor Variations
We love experimenting with fruit additions to create unique flavor profiles in our oat slice. Raisins or sultanas work beautifully as traditional choices, while dried cranberries, cherries, or apricots bring exciting bursts of tartness and chewy texture. For chocolate lovers, we recommend folding in chocolate chips or chunks to create a decadent twist similar to a Milk Chocolate Chip ANZAC slice.
Golden syrup adds remarkable richness and depth when incorporated into the base mixture. We often enhance our slices with a teaspoon of vanilla extract for aromatic warmth that complements the oats perfectly. Chopped nuts like walnuts or almonds provide satisfying crunch and protein, while warm spices such as cinnamon or nutmeg create cozy, comforting notes.
Caramel bits mixed throughout the base create pockets of sweet, gooey texture that contrast beautifully with the crispy oat surface. We find these additions transform our basic recipe into exciting new variations without compromising the slice’s signature chewy texture.
Dietary Modifications
We can easily adapt our oat slice recipe to accommodate various dietary needs without sacrificing flavor or texture. For egg-free versions, we substitute eggs with chia seeds soaked in water, creating a natural binding agent that works perfectly for those with egg allergies.
Vegan modifications require replacing butter with coconut oil or high-quality vegan butter alternatives. We swap honey for maple syrup when needed, maintaining the slice’s sweetness while keeping it completely plant-based. These substitutions preserve the original texture while expanding accessibility.
Gluten-free flour works seamlessly in place of regular flour for those managing gluten intolerance or sensitivity. We ensure all other ingredients remain gluten-free to create a safe option that tastes just as delicious as our traditional version. These modifications allow everyone to enjoy our beloved oat slice regardless of dietary restrictions.


Serving Suggestions
 6")
Our easy oat slice shines in countless serving scenarios that transform this simple treat into something truly special. We love presenting these golden squares on their own as a satisfying afternoon snack that pairs beautifully with a steaming cup of coffee or tea.
Protein-Packed Combinations elevate the nutritional value when we serve our oat slice alongside a generous dollop of Greek yogurt. The creamy texture creates a delightful contrast against the chewy oats while adding essential protein to fuel your day.
Fresh Fruit Pairings bring natural sweetness and vibrant colors to every serving. We recommend arranging sliced apples alongside oat slice squares for a classic combination that balances the rich flavors. Fresh berries scattered around the plate create an eye-catching presentation while adding antioxidants and refreshing tartness.
Lunchbox Hero status belongs to our oat slice when we wrap individual squares in parchment paper for portable convenience. These treats maintain their texture throughout the day and provide sustained energy for busy schedules.
Dessert Presentation transforms our oat slice when we warm individual pieces for 15-20 seconds in the microwave and serve with vanilla ice cream. The slight warming releases the buttery aromas while creating temperature contrast that enhances every bite.
Tea Time Elegance emerges when we cut our oat slice into smaller diamond shapes and arrange them on tiered serving stands. These bite-sized portions encourage conversation and sharing during afternoon gatherings.
Breakfast Innovation happens when we crumble cooled oat slice over bowls of yogurt or oatmeal for added texture and sweetness. This approach extends the recipe’s versatility beyond traditional snack times into morning meal planning.


Troubleshooting Tips
 7")
Even the most straightforward oat slice recipe can present challenges during preparation or baking. We understand that achieving the perfect texture and consistency requires attention to detail and proper technique.
Preventing Dry and Crumbly Texture
When your oat mixture appears too dry or crumbly we recommend adding extra melted butter one tablespoon at a time until the ingredients bind properly. Adding a splash of milk can also help achieve the right consistency without compromising the flavor profile. Press the mixture firmly into your prepared baking tin to ensure all ingredients stick together during the baking process.
Avoiding Dense Results
Never substitute quick oats for rolled oats as this ingredient swap creates an overly dense texture that lacks the characteristic chewiness we expect from oat slices. Quick oats break down too much during baking and absorb liquid differently than their rolled counterparts. Stick with traditional rolled oats for the best structural integrity.
Managing Baking Time and Temperature
Monitor your oat slice carefully during the final 5 minutes of baking since ovens can vary significantly in temperature accuracy. The slice should appear golden brown on top and feel firm to gentle touch when properly baked. Underbaking leads to a soggy center while overbaking creates hard edges that are difficult to cut cleanly.
Achieving Clean Cuts
Allow your oat slice to cool completely in the pan before attempting to cut it into portions. Cutting too early results in crumbling and uneven pieces that fall apart. For particularly soft or jam heavy versions refrigerate the cooled slice for 30 minutes before cutting to achieve the cleanest edges possible.
Fixing Mixture Consistency Issues
If your mixture seems too wet add small amounts of additional flour or oats until you reach the proper consistency. The mixture should hold together when pressed but not appear overly sticky or difficult to spread. Balance is key to achieving slices that hold their shape without becoming too dense or heavy.
Conclusion
We’ve shown you how this easy oat slice recipe delivers consistent results with minimal effort and maximum flavor. The combination of simple ingredients and straightforward techniques makes it accessible for bakers of all skill levels.
This versatile treat adapts beautifully to your preferences and dietary needs. Whether you’re packing lunchboxes serving afternoon tea or creating a warm dessert with ice cream the possibilities are endless.
The key to success lies in patience during cooling and following our troubleshooting tips. With proper storage techniques you’ll have delicious homemade oat slices ready whenever cravings strike.
We’re confident this recipe will become a staple in your baking repertoire bringing joy to your kitchen and smiles to everyone who tastes it.
Frequently Asked Questions
What ingredients do I need for this oat slice recipe?
You’ll need 2 cups rolled oats, 1 cup plain flour, 1 cup brown sugar, 1 cup desiccated coconut, 125g melted butter, 2 tablespoons golden syrup, 1 teaspoon baking soda, and 2 tablespoons boiling water for the base. For topping: 1 cup jam, extra 1/2 cup oats, and 2 tablespoons coconut.
How long does it take to bake the oat slice?
Bake the oat slice at 350°F (180°C) until golden brown. The exact baking time isn’t specified in the recipe, but you should watch for the golden color as your indicator. Allow 10 minutes cooling in the pan, then 45-60 minutes on a wire rack before cutting.
How should I store the oat slice?
Store completely cooled oat slice in an airtight container at room temperature for 3-4 days. Jam-filled varieties should be refrigerated for up to 5 days. For longer storage, wrap individual pieces and freeze for up to 3 months. Thaw overnight in the refrigerator before serving.
Can I make variations to this oat slice recipe?
Yes! Add fruits like raisins, cranberries, or chocolate chips for different flavors. Include nuts and spices for extra texture. Make it vegan by substituting coconut oil for butter, gluten-free with appropriate flour, or egg-free using chia seeds. These modifications maintain great taste and texture.
What kitchen equipment do I need?
Essential tools include a large mixing bowl, 8-inch x 8-inch baking tin, parchment paper, medium saucepan, measuring cups and spoons, wooden spoon or whisk, and a small bowl. Optional items like kitchen scales, pastry brush, and sharp knife can help with precision and presentation.
Why is my oat slice turning out dry and crumbly?
A dry, crumbly texture usually means insufficient moisture. Add a bit more melted butter or milk to the mixture. Also, ensure you’re using rolled oats instead of quick oats, as quick oats can create a dense texture. Don’t overbake, and allow proper cooling time.
How do I cut the oat slice cleanly?
Allow the slice to cool completely in the pan for 10 minutes, then transfer to a wire rack for 45-60 minutes. Use a sharp knife for clean edges. For softer varieties, refrigerate for 30 minutes or briefly freeze berry-topped versions before cutting for best results.
What are some serving suggestions for oat slice?
Serve with Greek yogurt for protein, pair with fresh fruits like apples and berries, or wrap individually for lunchboxes. Warm it and serve with vanilla ice cream as dessert, cut into small pieces for tea time, or crumble over yogurt and oatmeal for breakfast.


