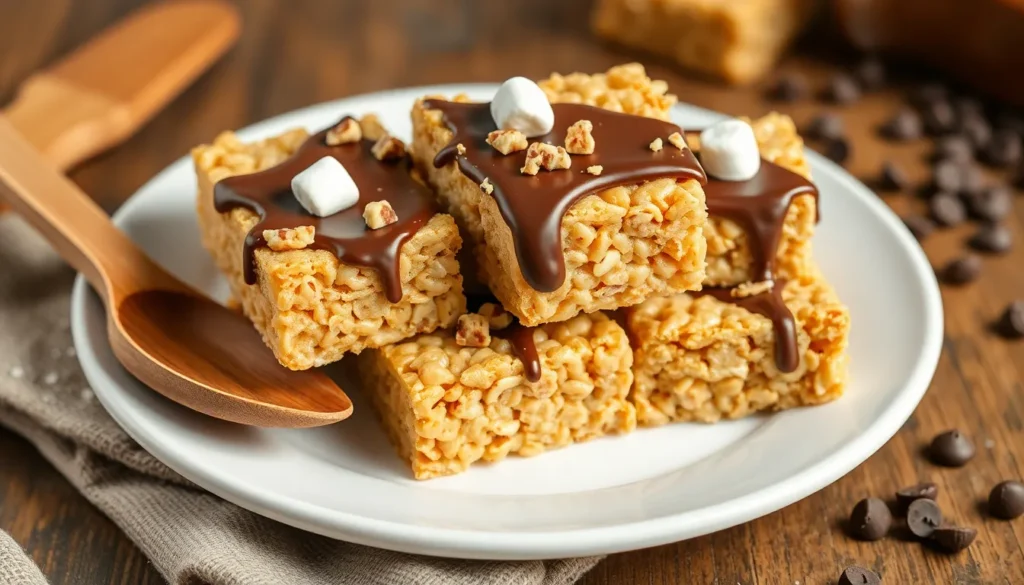
Nothing beats the irresistible combination of creamy peanut butter and crispy rice cereal that makes these peanut butter rice krispie bars absolutely addictive. We’ve perfected this no-bake recipe that delivers the perfect balance of sweet and salty flavors in every single bite.
These bars take less than 15 minutes to prepare and require just five simple ingredients you probably already have in your pantry. The magic happens when smooth peanut butter meets buttery marshmallows and creates that signature chewy texture we all crave.
Whether you’re planning a school bake sale, need a quick dessert for unexpected guests, or simply want to satisfy your sweet tooth, these peanut butter rice krispie bars deliver every time. We’ll show you exactly how to achieve that perfect consistency and share our secret tips for cutting clean squares that look as good as they taste.
Ingredients
We need just a handful of pantry staples to create these irresistible peanut butter rice krispie bars. Our ingredient list keeps things simple while delivering maximum flavor and texture.
For the Peanut Butter Rice Krispie Base
- 1 cup light corn syrup
- 1 cup granulated sugar
- 1 cup creamy peanut butter
- 6 cups Rice Krispies cereal
- 1 teaspoon vanilla extract
For the Chocolate Topping
- 1 cup semi-sweet chocolate chips
- 1/2 cup creamy peanut butter
- 2 tablespoons butter


Equipment Needed
 1")
Creating perfect peanut butter rice krispie bars requires the right equipment to ensure smooth preparation and professional results. We’ve compiled a comprehensive list of essential tools that will make your cooking process effortless and enjoyable.
Essential Cookware
Large Pot or Dutch Oven serves as our primary mixing vessel for this recipe. We recommend using a non-stick pot, Dutch oven, or enamel-coated pot when melting marshmallows and combining ingredients. This choice prevents sticking and makes the entire process significantly easier.
Spatula becomes indispensable for stirring ingredients and scraping the sides of our pot. We suggest keeping a greased spatula on hand specifically for pressing the sticky mixture into the pan later.
Baking Equipment
8″x8″ or 9″x13″ Pan determines the final thickness of our bars. We need to grease this pan thoroughly to prevent sticking. Larger pans create thinner bars while smaller pans produce thicker treats.
| Pan Size | Bar Thickness | Recommended Use |
|---|---|---|
| 8″x8″ | Thicker bars | Fewer servings, chewier texture |
| 9″x13″ | Thinner bars | More servings, lighter bite |
Measuring and Preparation Tools
Measuring Cups and Spoons ensure accuracy in our ingredient ratios. Precise measurements create consistent results every time we make these bars.
Butter or Cooking Spray prevents our mixture from sticking to the pan. We apply this liberally to both the pan and our pressing spatula.
Pro Tips for Success
We allow the treats to cool and set completely before cutting into bars. Optional refrigeration creates a firmer texture that some prefer. Using our greased spatula throughout the pressing process prevents the sticky mixture from adhering to our tools.


Prep Instructions
 2")
Before we begin mixing our peanut butter rice krispie bars, proper preparation ensures smooth cooking and perfect results every time.
Preparing Your Pan
We recommend greasing a 9×13 inch baking pan thoroughly with butter or non-stick cooking spray to prevent sticking. The generous coating allows us to remove our finished bars effortlessly without breaking or crumbling. For those who prefer thicker bars, an 8×8 inch pan works beautifully and creates more substantial squares that hold together well when cut.
Measuring Ingredients
Accurate measurements form the foundation of successful peanut butter rice krispie bars, so we always measure our ingredients before starting the cooking process. We suggest using dry measuring cups for the Rice Krispies cereal and liquid measuring cups for items like corn syrup or melted butter. Having all ingredients measured and within reach prevents the marshmallow mixture from overcooking while we scramble to find missing components. We place each measured ingredient in separate bowls or containers, creating an organized workspace that streamlines our cooking process.


Directions
 3")
We’ll walk you through each step to create these irresistible peanut butter rice krispie bars. The process moves quickly once we begin so having everything prepared beforehand ensures perfect results.
Making the Peanut Butter Mixture
We start by placing our large saucepan over low to medium heat to avoid burning the mixture. Add the butter and peanut butter to the pan stirring occasionally as they melt together into a smooth combination. Once our butter and peanut butter mixture becomes completely melted we add the mini marshmallows to the pan. Stir continuously until the marshmallows melt completely and the entire mixture becomes smooth and well combined.
Combining with Rice Krispies
We remove the saucepan from heat immediately once our marshmallow mixture reaches the perfect smooth consistency. Pour the Rice Krispies cereal into the warm mixture and stir thoroughly until every piece of cereal gets coated with the peanut butter marshmallow mixture. Make sure we combine everything evenly so each bite delivers the same delicious flavor and texture throughout our bars.
Pressing Into Pan
We lightly grease our 9×13 inch pan with butter or non-stick spray to prevent sticking. Transfer our peanut butter and cereal mixture into the prepared pan while it’s still warm and pliable. Press the mixture firmly and evenly into the pan using a greased spatula or our hands to create a uniform layer that will cut into clean squares later.
Preparing the Chocolate Layer
We place our chocolate chips in a microwave-safe bowl for the easiest melting method. Heat the chocolate in 45-second intervals stirring between each heating session until the chocolate becomes almost completely melted. Continue stirring until the chocolate reaches a perfectly smooth consistency adding a small amount of vegetable oil if needed to achieve the ideal spreading texture.
Adding the Chocolate Topping
We pour our melted chocolate evenly over the pressed Rice Krispie mixture in the pan. Spread the chocolate gently with a spatula to create an even layer that covers the entire surface. Allow the chocolate to harden completely at room temperature before cutting our bars into squares for the cleanest presentation and easiest serving.


Cooling and Setting
 4")
Patience becomes our greatest asset once we’ve assembled our peanut butter rice krispie bars. We must allow the bars to cool completely before cutting and serving, which typically takes at least one hour at room temperature.
The chocolate topping requires special attention during the cooling process. We recommend placing the pan in the refrigerator for at least one hour, though two hours delivers optimal results before cutting the bars into clean squares. This extended cooling time ensures the chocolate layer sets properly and won’t smear when we slice through it.
| Cooling Stage | Time Required | Storage Location |
|---|---|---|
| Initial cooling | 1 hour minimum | Room temperature |
| Chocolate setting | 1-2 hours | Refrigerator |
| Freezing for cutting | 1 hour | Freezer |
After the initial cooling period, we cut the bars into individual portions and transfer them to a baking sheet. Freezing the cut pieces for approximately one hour helps them maintain their shape and creates cleaner edges when we handle them.
Storage flexibility makes these bars particularly convenient for meal planning. We can store the finished bars in an airtight container at room temperature for up to 3-4 days. Using parchment or wax paper between layers prevents sticking when we stack multiple bars in the same container.
Long-term storage extends the enjoyment of our homemade treats. We freeze the bars for up to 2-3 months in freezer-safe containers or bags. When we’re ready to serve them, we simply thaw the bars in the refrigerator or let them come to room temperature naturally. This freezing method preserves both texture and flavor remarkably well.


Cutting and Serving
 5")
After our peanut butter rice krispie bars have properly cooled and set, we need to cut them carefully to achieve those perfect square pieces. The right technique makes all the difference between clean professional-looking bars and crumbly broken pieces.
How to Cut Clean Bars
We always wait for complete cooling before attempting to cut our bars. The cooling process ensures the bars hold their shape and slice cleanly without falling apart.
Sharp knives work best for cutting these treats. We recommend using a large chef’s knife or even a cookie cutter for uniform shapes. The blade must be sharp to prevent dragging and tearing through the mixture.
Gentle pressure prevents crumbling when we press the knife into the bars. We use smooth even motions rather than sawing back and forth. Each cut should be deliberate and confident to maintain the bar’s structure.
Clean the knife blade between cuts for the neatest results. Sticky residue from the peanut butter mixture can accumulate on the blade and create messy edges on subsequent cuts.
Storage Instructions
Room temperature storage works perfectly for short-term keeping. We place our cut bars in an airtight container where they stay fresh for up to 3 days.
| Storage Method | Duration | Container Type |
|---|---|---|
| Room Temperature | 3 days | Airtight container |
| Refrigerated | 5 days | Airtight container |
| Frozen | 2 months | Airtight container |
Extended storage requires refrigeration for optimal freshness. Our bars maintain their texture and flavor when refrigerated in an airtight container for up to 5 days.
Freezing extends the shelf life significantly when we need long-term storage. Properly wrapped bars can be frozen for up to 2 months without losing their delicious taste or texture.
Parchment paper prevents sticking when we stack multiple layers of bars. We place a sheet between each layer to keep the bars from adhering to each other during storage.


Make-Ahead Tips
 6")
We love how these peanut butter rice krispie bars work perfectly for busy schedules and special events. The mixture can be prepared several hours or even a day before you need to serve them.
Advance Preparation Strategy
Prepare the peanut butter mixture and press it into your lined pan up to 24 hours ahead of time. Store the pressed mixture in the refrigerator covered with plastic wrap to maintain freshness. When ready to serve, add the chocolate topping and allow it to set for the recommended time.
Freezer Preparation Method
Our favorite make ahead approach involves preparing the entire recipe and freezing the finished bars. Cut the completely set bars into squares and place them in a single layer on a parchment lined baking sheet. Freeze for one hour until solid, then transfer to airtight containers or freezer bags for longer storage.
Party Planning Timeline
For gatherings and events, we recommend making these bars 2-3 days in advance. The flavors actually improve after sitting, as the peanut butter and chocolate have time to meld together. Store them in an airtight container at room temperature until your event.
Batch Preparation Benefits
Double or triple the recipe when making ahead since the effort remains nearly the same. Press different batches into separate pans or use a larger 9×13 inch pan for bigger quantities. This approach saves time when you need treats for multiple occasions throughout the week.
Storage Duration Guidelines
| Storage Method | Duration | Best Practices |
|---|---|---|
| Room Temperature | 3-5 days | Airtight container required |
| Refrigerated | Up to 1 week | Cover to prevent drying |
| Frozen | 2-3 months | Wrap individually for portions |
The bars maintain their texture beautifully when stored properly, making them an ideal dessert for planning ahead without sacrificing quality or taste.
Variations and Substitutions
 7")
We love how adaptable this recipe is for different tastes and dietary needs. These simple swaps let you create entirely new flavor profiles while maintaining that perfect chewy texture.
Different Nut Butter Options
Almond butter transforms these bars with its distinctive nuttier flavor that pairs beautifully with the crispy rice cereal. We recommend using smooth almond butter for the best consistency and even distribution throughout the mixture.
Cashew butter brings a creamy and slightly sweet taste that makes these bars feel more indulgent. The natural sweetness of cashew butter reduces the need for additional sugar while creating an incredibly smooth texture.
Hazelnut spread adds both nutty and chocolatey notes that complement the chocolate topping perfectly. This option creates a more dessert-like flavor profile that appeals especially to chocolate lovers.
Chocolate Alternatives
Milk chocolate offers a sweeter and creamier option that works wonderfully for those who prefer less intense chocolate flavors. The higher sugar content in milk chocolate creates a smoother melting consistency for easier spreading.
White chocolate introduces a vanilla flavor that brightens the entire bar while maintaining that satisfying chocolate layer. We find white chocolate pairs exceptionally well with almond butter variations.
Dark chocolate provides a richer and less sweet option that balances the sweetness of the marshmallow base. The intense cocoa flavor creates a more sophisticated taste profile perfect for adult gatherings.
Add-In Ideas
Chopped peanuts or walnuts add delightful crunch and enhance the nutty flavors already present in the bars. We recommend adding about 1/2 cup of nuts to maintain the proper texture balance.
Dried cranberries or raisins provide bursts of sweetness and chewy texture that complement the crispy cereal perfectly. These fruit additions work especially well with almond butter variations.
M&M’s or chopped peanut butter cups bring fun colors and extra flavor excitement to each bite. We suggest pressing these add-ins gently into the top layer before adding chocolate to prevent them from sinking during cooling.


Troubleshooting Common Issues
 8")
Making perfect peanut butter Rice Krispie bars requires attention to detail, and we’ve identified the most common problems home bakers encounter. Understanding these issues helps us achieve consistently delicious results every time.
Treats Turn Out Too Hard
Overheating marshmallows creates the most frequent problem we see with these bars. When marshmallows burn from excessive heat or prolonged cooking time, our treats become unpleasantly hard and difficult to bite.
We recommend using low heat throughout the melting process and stirring constantly to prevent burning. Microwave users should heat in short 30-second intervals, checking frequently between each heating cycle. This gentle approach ensures our marshmallows melt smoothly without compromising texture.
Treats Turn Out Too Soggy or Stale
Excessive butter creates soggy bars that lack the desired chewy consistency we want. Off-brand cereals and marshmallows also contribute to texture problems that disappoint our expectations.
We solve this by reducing butter quantities and investing in high-quality ingredients. Premium marshmallows and original Kellogg’s Rice Krispies deliver superior results compared to generic alternatives.
Marshmallows Fail to Melt Properly
Old or low-quality marshmallows refuse to melt evenly, creating lumpy mixtures that won’t combine properly with our other ingredients.
Fresh marshmallows from reputable brands like Jet-Puffed ensure smooth melting and consistent texture. We always check expiration dates and store marshmallows in airtight containers to maintain freshness.
Peanut Butter Separation
Natural peanut butter with oil separation creates inconsistent results that affect our bars’ binding properties. The separated oils interfere with proper mixture formation.
We recommend using creamy peanut butter like Jif brand for optimal texture and consistency. These processed varieties eliminate separation issues and provide reliable results every time.
Cereal Not Crunchy
Wrong cereal types or off-brand Rice Krispies produce bars that lack the signature crunch we expect from this classic treat.
Sticking with original Kellogg’s Rice Krispies maintains the authentic texture that makes these bars special. Generic cereals often lack the proper crispness that defines successful peanut butter Rice Krispie bars.


Conclusion
These peanut butter rice krispie bars prove that the best treats don’t always require complicated techniques or expensive ingredients. We’ve shown you how simple pantry staples can transform into an irresistible dessert that’ll have everyone asking for the recipe.
The beauty of this treat lies in its versatility and foolproof nature. Whether you’re preparing for a last-minute gathering or planning ahead for special occasions you now have all the tools to create consistently perfect bars every time.
We encourage you to experiment with the variations we’ve shared and make this recipe your own. Once you master the basic technique you’ll find countless ways to customize these bars to suit any taste preference or dietary need.
Frequently Asked Questions
How long does it take to make peanut butter rice krispie bars?
These no-bake peanut butter rice krispie bars can be prepared in under 15 minutes of active cooking time. However, you’ll need to allow at least one hour for cooling at room temperature, plus an additional 1-2 hours in the refrigerator for the chocolate topping to set properly.
What ingredients do I need for peanut butter rice krispie bars?
You’ll need five basic ingredients for the base: light corn syrup, granulated sugar, creamy peanut butter, Rice Krispies cereal, and vanilla extract. For the chocolate topping, you’ll need semi-sweet chocolate chips, creamy peanut butter, and butter. All are common pantry staples.
What equipment is essential for making these bars?
You’ll need a large non-stick pot or Dutch oven for melting marshmallows, a spatula for stirring and pressing, and a greased baking pan (8″x8″ for thicker bars or 9″x13″ for thinner bars). Precise measuring tools are also important for consistent results.
How should I store peanut butter rice krispie bars?
Store the bars in an airtight container at room temperature for 3-4 days or freeze for 2-3 months. For best texture, keep them refrigerated if your kitchen is warm. When freezing, wrap individual squares in plastic wrap before placing in containers.
Can I make these bars ahead of time?
Yes, these bars are perfect for make-ahead preparation. You can prepare them several hours or even a day in advance. The peanut butter mixture can be pressed into the pan up to 24 hours ahead and stored covered in the refrigerator.
What variations can I try with this recipe?
You can substitute different nut butters like almond, cashew, or hazelnut spread. Try different chocolate types (milk, white, or dark chocolate) for the topping. Add-ins like chopped nuts, dried fruits, or candies can enhance flavor and visual appeal while maintaining the signature chewy texture.
Why did my bars turn out too hard or soggy?
Hard bars usually result from overheating marshmallows, while soggy bars come from excessive butter. Use low heat when melting ingredients, stick to high-quality fresh marshmallows, and use creamy peanut butter to prevent separation. Original Kellogg’s Rice Krispies work best for maintaining crunch.
What’s the best way to cut clean squares?
Allow the bars to cool completely before cutting, then freeze the cut bars for about one hour to maintain their shape. Use a greased knife or spatula to prevent sticking, and wipe the blade clean between cuts for the neatest edges.


