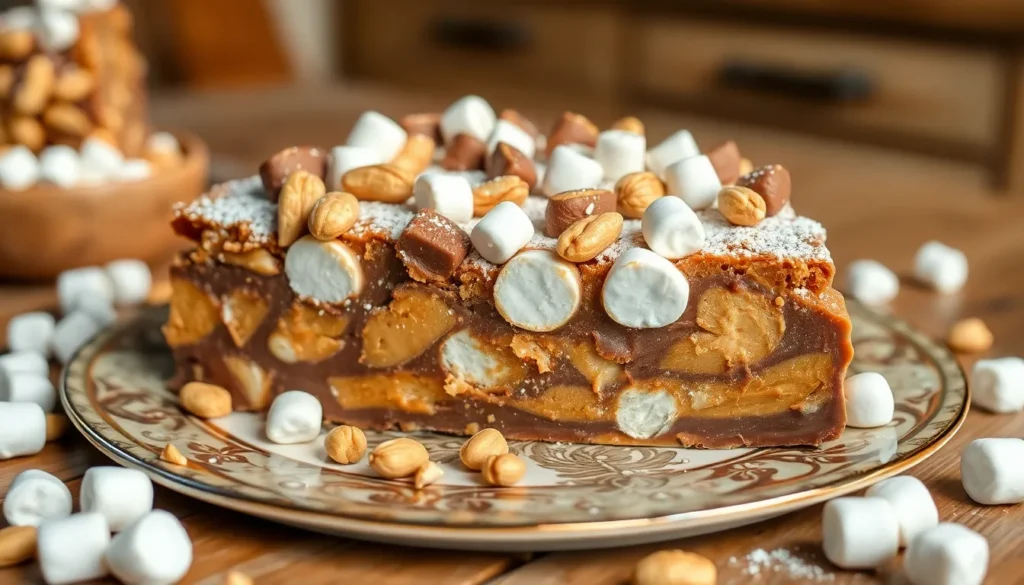
We’ve taken the beloved classic rocky road and given it a peanut butter twist that’ll have you coming back for seconds. This irresistible treat combines the rich creaminess of peanut butter with crunchy nuts and fluffy marshmallows for the ultimate indulgent experience.
What makes our peanut butter rocky road special? It’s the perfect balance of textures and flavors that creates pure magic in every bite. The smooth peanut butter base melts beautifully with chocolate while roasted peanuts add that satisfying crunch we all crave.
Whether you’re planning a family gathering or just want to treat yourself to something extraordinary, this no-bake dessert comes together in minutes. We’ll show you how to create this crowd-pleasing confection that’s guaranteed to become your new favorite sweet obsession.
Ingredients
We’ve carefully selected each ingredient to create the perfect balance of creamy peanut butter richness and classic rocky road textures. Our recipe requires simple pantry staples that combine to deliver an irresistible no-bake dessert.
For the Peanut Butter Base
- 1 cup creamy peanut butter
- 1/2 cup unsalted butter, softened
- 2 cups powdered sugar, sifted
- 1 teaspoon vanilla extract
- 1/4 teaspoon salt
For the Rocky Road Mix-ins
- 2 cups mini marshmallows
- 1 cup roasted peanuts, roughly chopped
- 1/2 cup chocolate chips or chunks
- 1/4 cup crushed graham crackers (optional)
For the Chocolate Topping
- 8 oz semi-sweet chocolate, chopped
- 2 tablespoons coconut oil or vegetable shortening
- 1/4 cup additional mini marshmallows for garnish
- 2 tablespoons chopped roasted peanuts for garnish


Equipment Needed
 1")
Creating our peanut butter rocky road requires minimal kitchen equipment, making this dessert accessible for bakers of all experience levels. We recommend gathering these essential tools before starting to ensure smooth preparation from start to finish.
Essential Equipment:
- 9×13 inch rimmed baking dish – This size provides the perfect depth for our rocky road bars while allowing even setting
- 8×8 inch square baking pan – An excellent alternative for thicker bars or smaller batches
- Saucepan – Essential for melting chocolate and peanut butter on the stovetop with precise temperature control
- Microwave-safe bowl – Perfect for quick melting when using the microwave method
- Parchment paper – Creates a non-stick surface and makes removal effortless after chilling
Additional Helpful Tools:
- Butter or baking spray – Ensures easy release from the pan even with parchment paper
- Large mixing spoon – Needed for combining all ingredients smoothly
- Sharp knife – Required for clean cuts when slicing the finished rocky road into bars
Most home kitchens already contain these basic items, eliminating the need for specialized equipment purchases. We find that having all tools ready before beginning makes the process more enjoyable and prevents any interruptions during preparation. The combination of stovetop and microwave options gives flexibility based on your preferred melting method and available time.


Instructions
 2")
We’ll guide you through each step to create this irresistible peanut butter rocky road treat. Our straightforward process ensures perfect results every time.
Prep the Pan
Lightly grease your 9×9-inch pan with butter or cooking spray to prevent sticking. Line the pan completely with parchment paper, leaving overhang on all sides for easy removal once the bars are set. This preparation step makes cutting and serving your rocky road bars effortless.
Make the Peanut Butter Base
Combine 1 cup chocolate chips, 1/2 cup creamy peanut butter, and 2 tablespoons butter in a medium saucepan. Heat the mixture over low to medium heat while stirring constantly until completely smooth and melted. We recommend using a microwave-safe bowl as an alternative method, heating in 30-second intervals and stirring between each interval to prevent overheating. The mixture should be glossy and well combined when ready.
Add the Rocky Road Mix-ins
Remove the melted chocolate mixture from heat and immediately stir in 2 cups mini marshmallows and 1 cup roasted peanuts. Mix gently to distribute the ingredients evenly throughout the base without crushing the marshmallows. Add any optional mix-ins like crushed pretzels or peanut butter cup pieces at this stage for extra texture and flavor.
Create the Chocolate Layer
Pour the entire rocky road mixture into your prepared pan, spreading it evenly with a spatula. The chocolate and peanut butter base serves as both the foundation and binding agent for all ingredients. Press down lightly to ensure the surface is level and all mix-ins are well incorporated into the chocolate base.
Chill and Set
Refrigerate the pan for 2 to 4 hours until the rocky road bars are completely firm to the touch. Once set, lift the bars from the pan using the parchment paper overhang and transfer to a cutting board. Cut into 16 equal squares using a sharp knife, wiping the blade clean between cuts for neat edges.


Directions for Cutting and Serving
 3")
Once our peanut butter rocky road has chilled completely we can transform it into perfect serving portions. The key to clean cuts lies in using the right technique and proper timing.
Prepare for Cutting
Remove the chilled rocky road from the refrigerator and let it sit at room temperature for 5 to 10 minutes. This brief warming period softens the mixture slightly making it easier to cut without cracking. We lift the entire block from the pan using the parchment paper edges as handles.
Create Clean Cuts
Using a sharp knife we score the surface lightly to mark our desired portion sizes. For optimal serving portions we cut into 2×1 inch bars which provide the perfect bite-sized experience. Wipe the knife blade clean between cuts to prevent dragging and ensure neat edges. Press down firmly with a smooth motion rather than sawing back and forth.
Serving Temperature and Storage
We serve our peanut butter rocky road bars chilled for the best texture and flavor experience. The cool temperature maintains the firm structure while allowing the rich peanut butter and chocolate flavors to shine. Store cut pieces in an airtight container in the refrigerator where they remain fresh for up to one week.
Presentation Tips
For special occasions we arrange the bars on a serving platter lined with parchment paper. The contrast between the dark chocolate topping and colorful mini marshmallows creates an appealing visual display. Dust lightly with powdered sugar or drizzle with melted chocolate for an elegant finishing touch.


Make-Ahead Instructions
 4")
We love how easily this peanut butter rocky road adapts to our busy schedules. The dessert actually improves in flavor and texture when prepared ahead of time, making it perfect for entertaining or meal prep.
Our make-ahead process begins with proper preparation timing. We recommend preparing this treat at least 4 hours before serving, though overnight chilling produces the best results. The extended refrigeration time allows all flavors to meld together while ensuring the perfect firm texture for clean cuts.
Storage becomes effortless with the right approach. We line our baking dish with parchment paper extending over the edges, creating convenient handles for lifting. Once the rocky road sets completely, we remove the entire block from the pan and wrap it tightly in plastic wrap before placing it in an airtight container.
Refrigerator storage keeps our peanut butter rocky road fresh for up to one week. We place the wrapped dessert in the coldest part of our refrigerator to maintain optimal texture. The bars retain their shape beautifully and taste just as delicious as when first made.
Freezer storage extends the life of our rocky road for up to three months. We cut the dessert into individual squares before freezing, separating layers with parchment paper in a freezer-safe container. This method allows us to remove only the portions we need without thawing the entire batch.
| Storage Method | Duration | Best Practices |
|---|---|---|
| Refrigerator | Up to 1 week | Wrap tightly in plastic wrap |
| Freezer | Up to 3 months | Cut into squares, layer with parchment |
| Room Temperature | 2-3 hours max | Cover with foil, avoid warm areas |
Thawing frozen portions requires minimal effort. We transfer individual squares from freezer to refrigerator 30 minutes before serving. The rocky road maintains its original taste and texture without becoming soggy or losing its structural integrity.
Transport preparation ensures our dessert travels well to gatherings. We keep the rocky road chilled in a cooler with ice packs and cut pieces just before serving. This approach prevents melting while maintaining the perfect consistency our guests expect.


Storage Tips
 5")
Proper storage ensures our peanut butter rocky road maintains its perfect texture and flavor for maximum enjoyment. We recommend storing these delicious bars in an airtight container to preserve their freshness and prevent them from drying out.
Room Temperature Storage
Our peanut butter rocky road bars stay fresh at room temperature for 3 to 5 days when stored in an airtight container. This storage method works well if we plan to consume the treats within a few days of making them. The bars maintain their ideal consistency without becoming too firm or too soft.
Refrigerated Storage
For longer freshness we store the bars in an airtight container in the refrigerator where they stay fresh for up to a week. Refrigeration helps maintain the structural integrity of the marshmallows and prevents the peanut butter base from becoming too soft in warmer temperatures.
Preventing Sticking
We layer our rocky road bars between sheets of parchment or wax paper when storing them to prevent sticking. This technique keeps each bar intact and makes removal from the container much easier when we’re ready to serve.
| Storage Method | Duration | Container Type |
|---|---|---|
| Room Temperature | 3-5 days | Airtight container |
| Refrigerated | Up to 1 week | Airtight container |
| Long-term room temperature | Up to 2 weeks | Airtight container |
Freezing Considerations
We avoid freezing peanut butter rocky road bars for extended storage periods as this can negatively affect the texture of the marshmallows and overall consistency. But we can freeze the bars for about 20 minutes immediately after preparation to help them set more quickly if needed.
Best Practices
Our bars taste best when consumed within the first few days of preparation for optimal freshness and texture. While properly stored rocky road can last up to two weeks at room temperature it will gradually dry out over time so earlier consumption provides the best eating experience.
Variations and Substitutions
 6")
We love how versatile peanut butter rocky road can be with simple ingredient swaps and creative additions. These modifications allow us to customize the dessert to match different flavor preferences and dietary needs.
White Chocolate Variation
We can transform our traditional rocky road by substituting white chocolate for the standard milk or dark chocolate. This variation creates a smoother texture and delivers a lighter flavor profile that pairs beautifully with the rich peanut butter base. The white chocolate adds an elegant sweetness that complements the salty peanuts and fluffy marshmallows perfectly.
Chocolate Peanut Butter Enhancement
Our chocolate peanut butter version combines both milk and dark chocolate with the peanut butter base for an intensely rich experience. This combination creates a silky texture and deeper chocolate flavor that chocolate lovers will appreciate. The dual chocolate approach balances sweetness with slight bitterness for a more complex taste.
Fudgy Rocky Road Bars
We can create fudgy peanut butter rocky road bars by incorporating pretzels, candy-coated chocolates, and peanut butter cups into our mix. These additions provide extra crunch and bursts of flavor throughout each bite. The pretzel pieces add a delightful salty contrast while the candy pieces create colorful surprises.
Nut Butter Alternatives
Almond butter serves as an excellent substitute for peanut butter when we want a slightly different nutty flavor. This swap maintains the creamy base while offering a more subtle taste that some prefer. Other nut butters like cashew or sunflower seed butter work well for those with peanut allergies.
Chocolate Options
We can interchange semi-sweet, milk, or dark chocolate chips depending on our desired sweetness and richness levels. Each chocolate type brings its own character to the dessert:
| Chocolate Type | Sweetness Level | Flavor Profile |
|---|---|---|
| Semi-sweet | Medium | Balanced chocolate flavor |
| Milk chocolate | High | Creamy and sweet |
| Dark chocolate | Low | Rich and slightly bitter |
Creative Mix-In Additions
Beyond the standard mini marshmallows and salted peanuts, we can experiment with different textures and flavors. Butterscotch chips add a caramel-like sweetness that complements the peanut butter beautifully. We can also incorporate different marshmallow sizes or various nuts to change the texture profile.
Decorative Finishing Touches
We enhance our rocky road’s visual appeal by adding M&Ms or colorful sprinkles as coatings and toppings. These additions create a fun presentation and add extra sweetness and color. The candy pieces also provide small bursts of different flavors throughout each serving.


Conclusion
We’ve shown you that peanut butter rocky road isn’t just another dessert—it’s a game-changer that’ll transform your treat repertoire. This no-bake wonder delivers all the satisfaction of traditional rocky road while adding that irresistible peanut butter twist we all crave.
Whether you’re hosting a party or simply treating yourself, this recipe’s simplicity and flexibility make it a winner every time. The make-ahead convenience means you can focus on enjoying time with loved ones rather than stressing in the kitchen.
Ready to create your own batch of this indulgent masterpiece? We guarantee that once you try our peanut butter rocky road, you’ll never look at dessert the same way again. Your taste buds will thank you for this delicious upgrade to a beloved classic.
Frequently Asked Questions
What ingredients do I need to make peanut butter rocky road?
You’ll need creamy peanut butter, unsalted butter, powdered sugar, vanilla extract, salt, mini marshmallows, roasted peanuts, chocolate chips, and optional crushed graham crackers. For the chocolate topping, use semi-sweet chocolate and coconut oil or vegetable shortening.
Do I need special equipment to make this dessert?
No special equipment is required. You’ll only need basic kitchen items: a 9×13 inch baking dish or 8×8 inch square pan, a saucepan or microwave-safe bowl for melting, parchment paper, and a mixing spoon. Most home kitchens already have these essentials.
How long does peanut butter rocky road need to chill?
The dessert needs to chill for 2 to 4 hours until firm. For best results, overnight chilling is recommended as it improves both flavor and texture, making it perfect for advance preparation.
How should I store peanut butter rocky road bars?
Store bars in an airtight container at room temperature for 3-5 days or refrigerate for up to a week. Layer bars between parchment paper to prevent sticking. Avoid long-term freezing as it may change the texture.
Can I make substitutions to the recipe?
Yes! You can use different nut butters like almond or sunflower seed butter, substitute white chocolate for a lighter flavor, or add creative mix-ins like pretzels, butterscotch chips, or colorful sprinkles to customize the dessert.
How do I cut clean, even bars?
Let the chilled dessert sit at room temperature for 5-10 minutes before cutting. Use a sharp knife to score the surface first, then cut into 2×1 inch bars. This technique ensures clean edges and perfect serving sizes.
Can I make this dessert ahead of time?
Absolutely! Peanut butter rocky road actually improves when made ahead. Prepare at least 4 hours before serving, with overnight preparation yielding the best results. It’s perfect for entertaining and meal prep.
What variations can I try with this recipe?
Try using white chocolate for a milder flavor, combine milk and dark chocolate for richness, or add pretzels and candy-coated chocolates for a fudgy version. You can also experiment with different nuts and creative mix-ins.


